This is the final one! My last mirror in waiting, now given her makeover.
This is how I found her, abandoned in a dirty storage building.
I will not go into too many details on this makeover, since I’ve already posted in length about the previous two, but I’ll show you some of the process.
Of course the mirror had to be cleaned before any work could begin. Willie took care of most of that outside, and then I did the final wipe-downs inside right before painting.
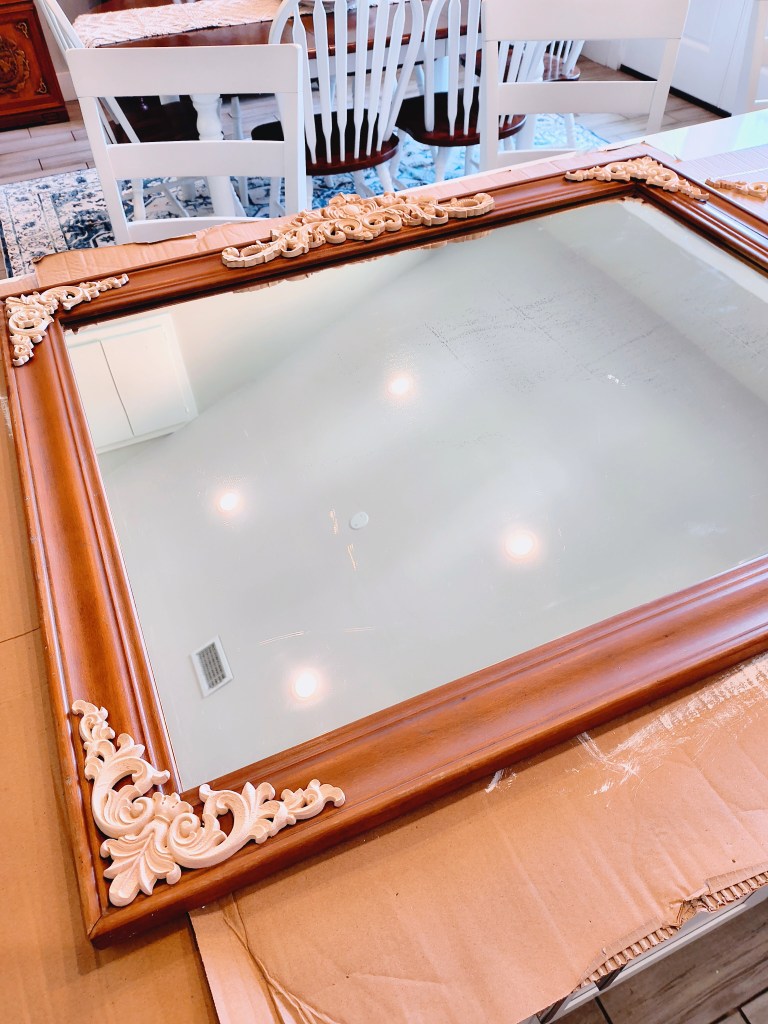
Willie removed the previous wooden appliques that were featured on this mirror, and I chose 2 appliques with roses for the top, and then 2 corner embellishments for the bottom.
I got the mirror taped off, and then began painting. To be honest, I did not know how I wanted it painted. I only knew that I wanted it to be blue. I purchased peacock blue and teal paints, as I am wanting to bring in more of these types of blue tones into my office. I ended up using both tones of paint, along with white. I am not a professional painter, or makeover artist, I just jump in and go for it!
I began by first applying some white paint, then swiping over it with the blue tones. I went with teal down the sides, and and peacock along the top and bottom.
I ended up blending the blues, but I just wasn’t happy with how it was coming out. But not to dismay. I decided to go back over it with white paint again.
After a little back and forth, I am happy with the results.
As you can see, I painted all the wooden appliques using the same type of method. These were a lot easier to do than the mirror. I just painted a white base coat, then dry brushed the peacock blue and teal paints across the raised edges.
I also painted a white plaster rose hanger, and an iron hat rack, using the same paints and technique.
Now I have a cute out the door station in my office, with my purse, hats, and mirror, for last check.
I hope my project inspires you to try something new yourself.
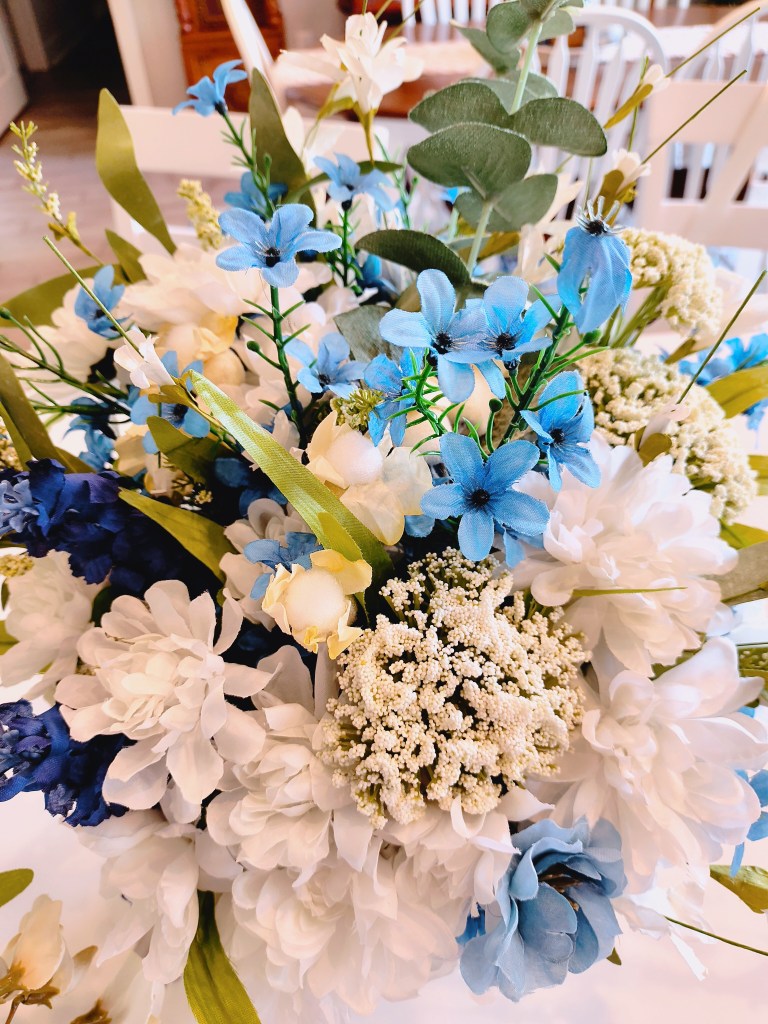
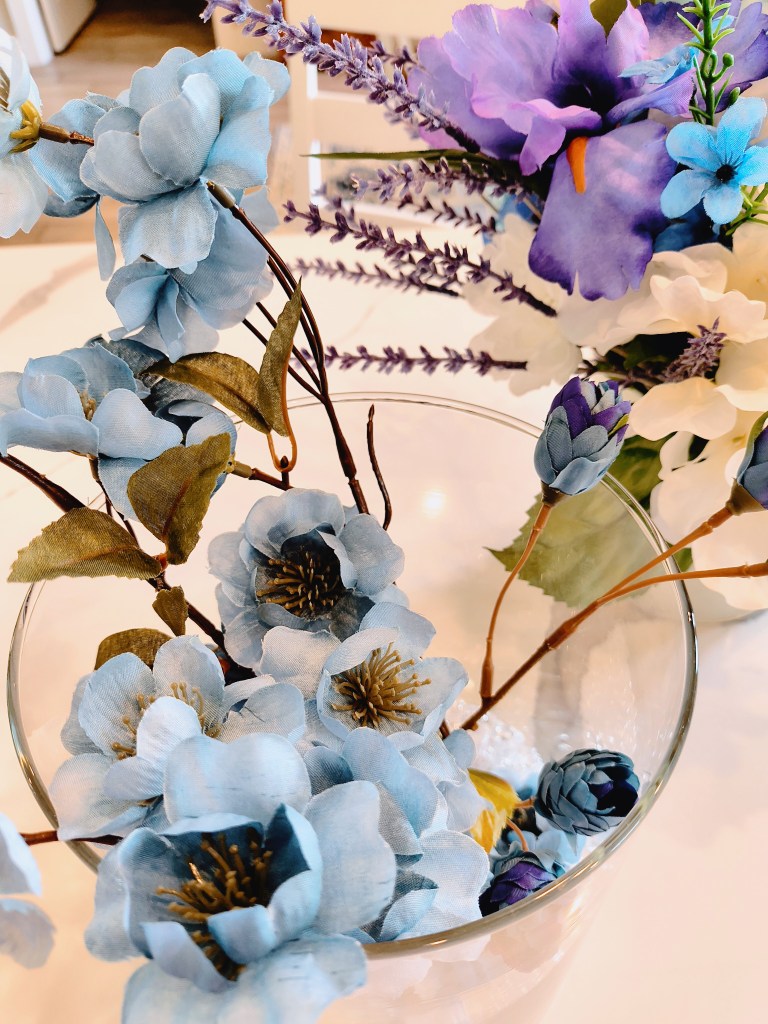
I love floral arranging! I may not be a professional, and I’ve not taken any classes, as someone’s asked, but I certainly enjoy expressing my own creativity in making arrangements for our home.
I will also make a confession to you. I sometimes have to do them over twice, or more, to get them just the way I want them. But it’s always just a lot of fun for me.
I purchased an array of blue and white faux florals at Michaels this time. They were having 50% off all Summer florals. I could see a lot of empty shelves, and Halloween stuff now being brought in. It’s the same at Hobby Lobby now, too. It won’t be long till we’re all decorating for Fall!
When I begin an arrangement, I’m never quite sure how it’s going to come together, so I just start with pieces that I think will make a great focal point in an arrangement.
I thought these larger sprigs were really pretty, so I chose the variated Hydrangea for an arrangement for my office, and the other tall blue floral with multiple layers, for our bedroom.
I left these two larger florals in-tact, and began building around them.
That’s where I went wrong, but I did not realize it at the time. Here are my completed first attempts.
This first arrangement, I was calling Marie Antoinette. I suppose you can see why.
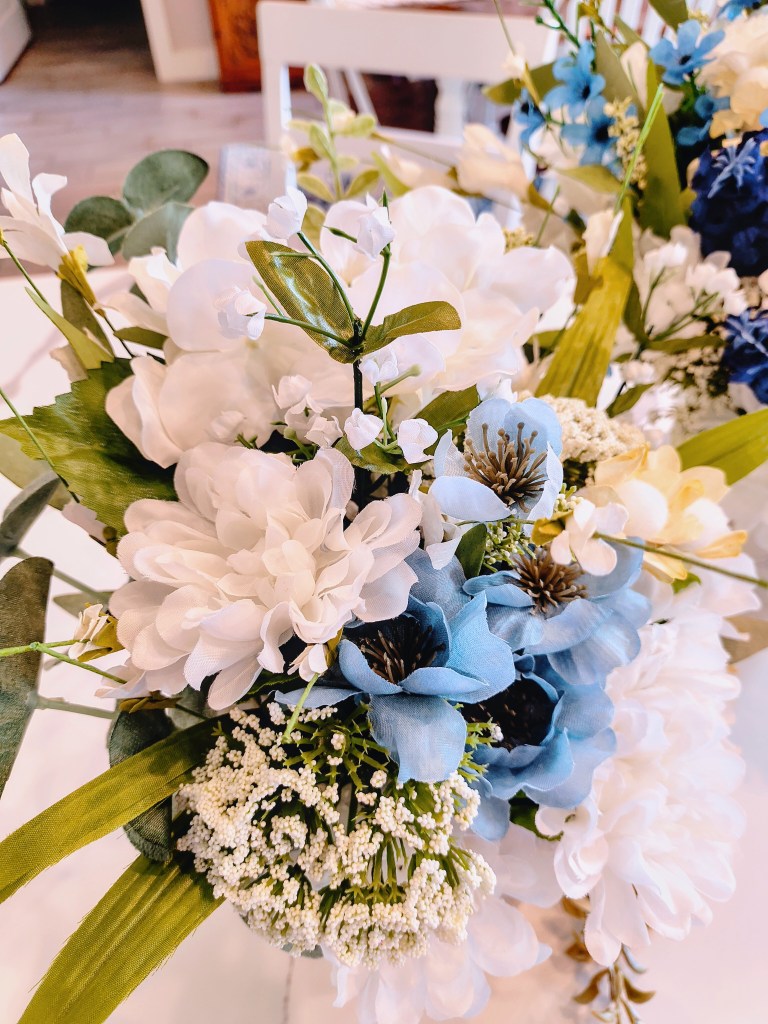
The second one was way too heavy in the back.
And, I made two other accompanying arrangements for each, in the glass vases.
I lived with all of these arrangements for one night. They all got a makeover the very next day. And that’s the great thing about making floral arrangements (at least for me, the beginner, still learning), they can be redone very easily, or changed around.
I took everything out of all the vases/cans, and started anew. I did stick with a blue and beige toned theme for our bedroom, and went blue and purple for my office.
Ready for the made-over arrangements?
Blue and beige for the bedroom:
I like these so much better! I cut apart that really large blue sprig that had all the different layers of flowers, and dispersed them throughout the arrangement. It made everything more balanced. The arrangement in the glass jar received additional florals to fill it out more, plus I added one of the blue florals to make it cohesive with it’s partner.
A closeup of the larger arrangement:
And the smaller one:
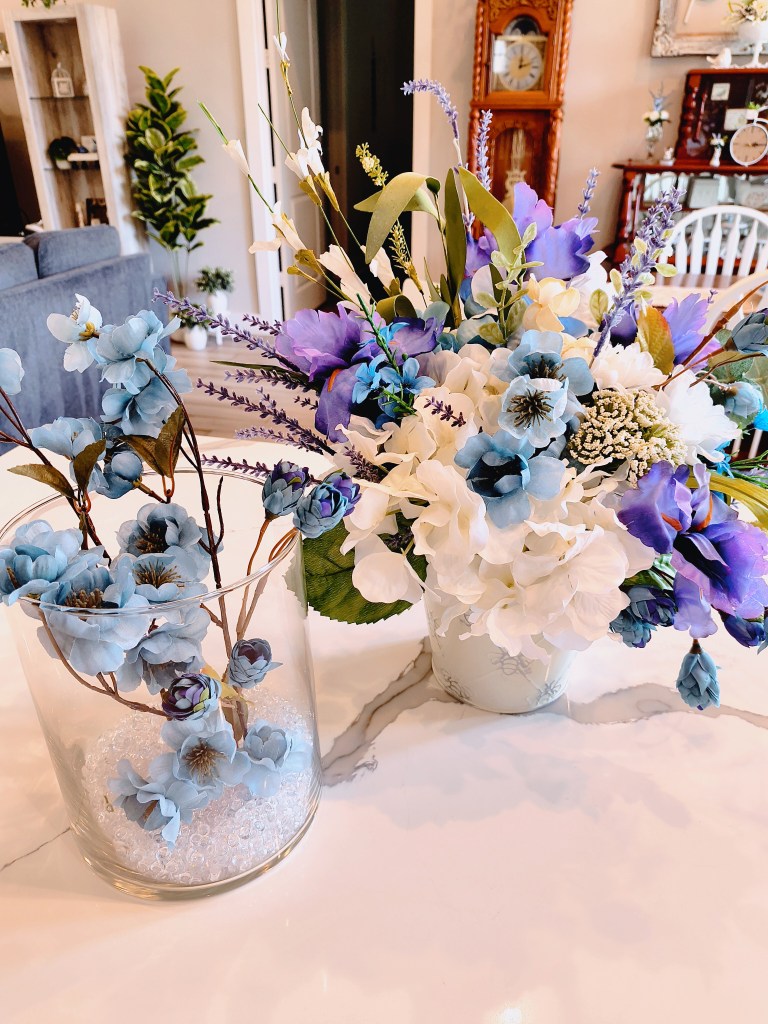
And for my office, I re-did the arrangement with the Hydrangea (Marie Antoinette), plus made an accompanying arrangement in the taller glass jar:
Do you recognize the blue florals in the glass vase? Yes, those are 2 cuttings from that really tall blue sprig. I put one in the jar so I’d know where it was, and I really liked the way it looked, being able to see all the florals inside the vase, so I added a few more cuttings from that sprig, as well as another with blue and purple, and thought that I really liked it kept simple, so I did keep it simple. It’s all a matter of what makes me smile.
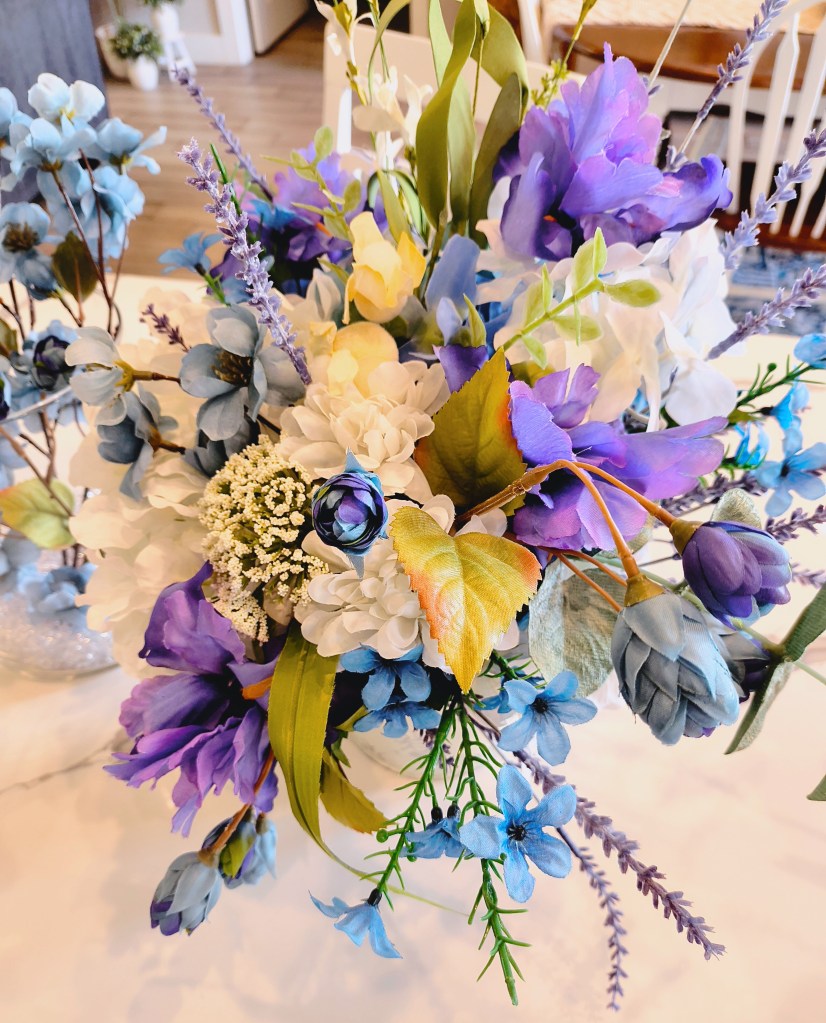
So, here’s a closeup of the larger blue and purple arrangement. I purposely chose florals with lighter/brighter greens, as I plan to have more green and teal tones (along with blue) in the office.
And the simple arrangement in the glass jar:
Sometimes simple is best.
I hope you’ve enjoyed my floral making attempts, and that they inspire you to give it a try for yourself.
Till next time, be kind, and always follow your joy! God is truly good!
Well, I wasn’t sure if I wanted to begin with the before, or the after photo. I’m opting for the after photo first. I’m so pleased with the outcome of this vintage mirror upcycle. I can’t believe I was able to achieve such a makeover all by myself. Well, with a little help from Willie, I suppose (winks!).
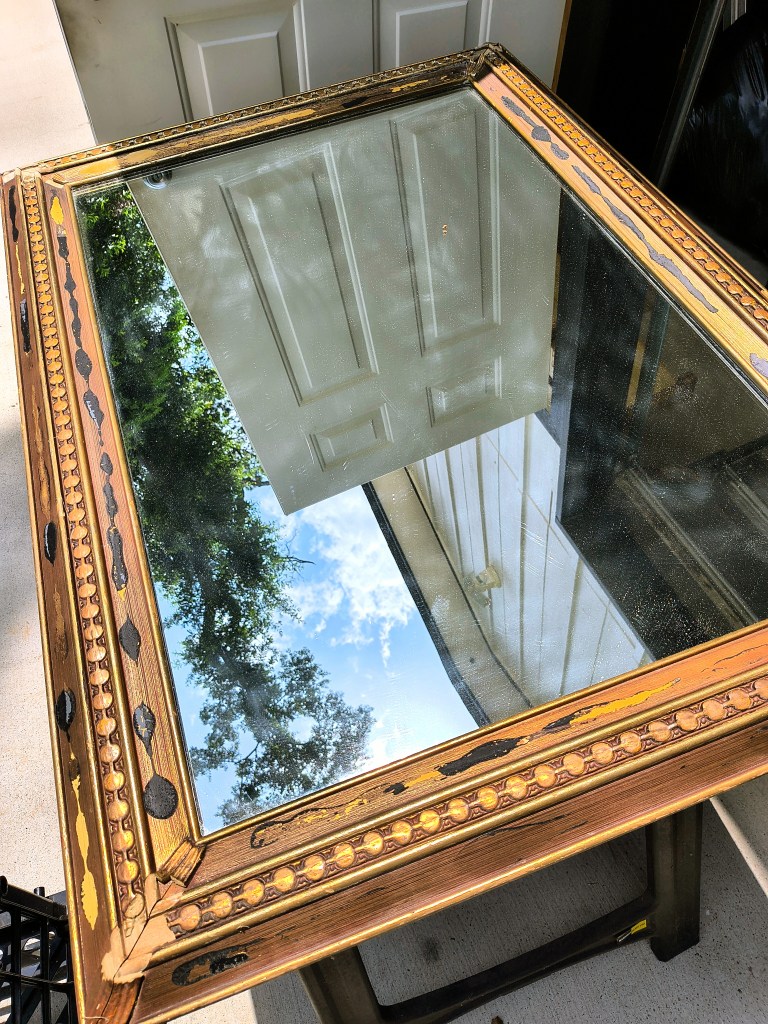
I found this old mirror in a building at Willie’s family business. Everything is being cleared out, so this would have most likely been thrown out if I had not salvaged it, especially in the shape I found it in.
Now, who wouldn’t want to bring this beauty home? I mean, it’s gorgeous home decor!
But yeah, I had been on the hunt for a large mirror for Royalview, and I found 2, perhaps not in the best condition, but I thought they had good potential.
Willie was very kind to get this all cleaned up for me before we brought it indoors for it’s makeover. It looked a lot better after a good cleaning.
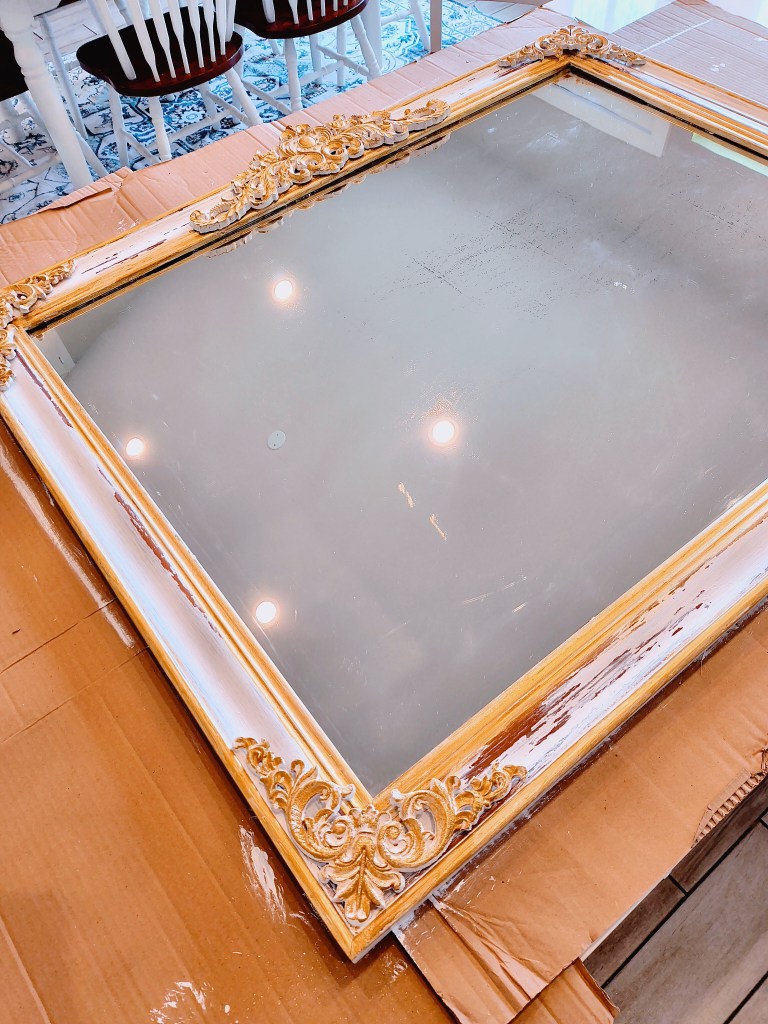
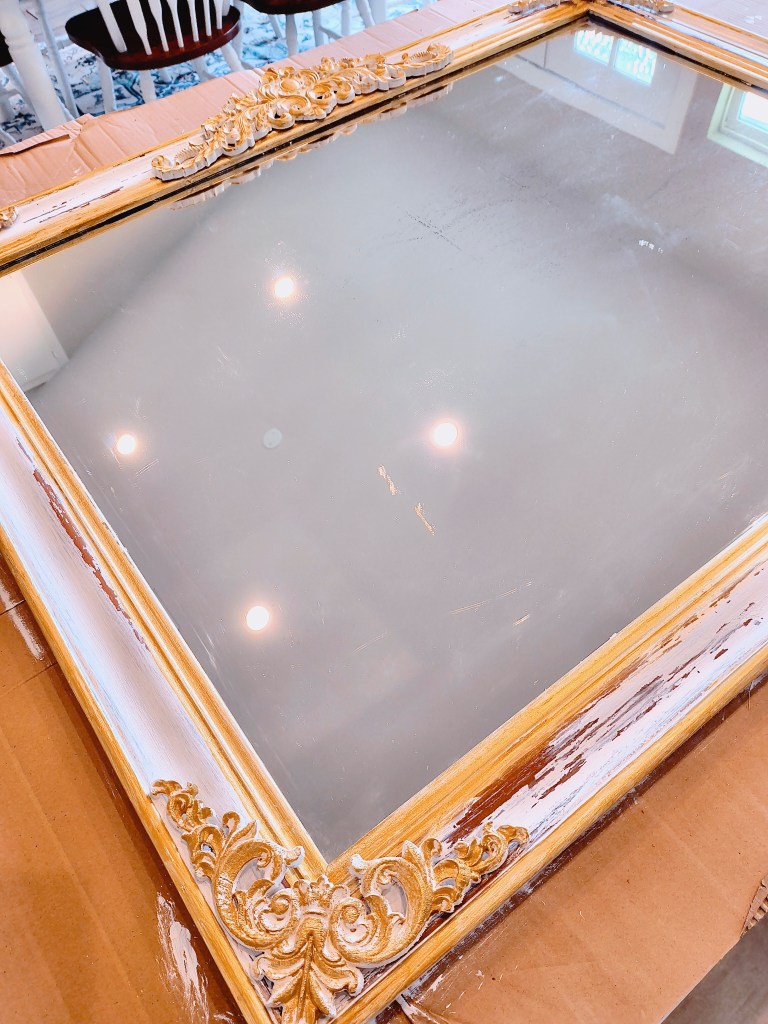
I knew I wanted to add some beautiful decorative embellishment to this mirror. I was inspired by a Vlogger I follow, called Walk With Me Tim. He and his wife stayed in a beautiful hotel in Venice where they had these gorgeous old mirrors that were very ornate, and yet the mirrors themselves were aged. This mirror had the same feels for me with the aging of the mirror, so let’s turn it into a vintage Venice inspired mirror!
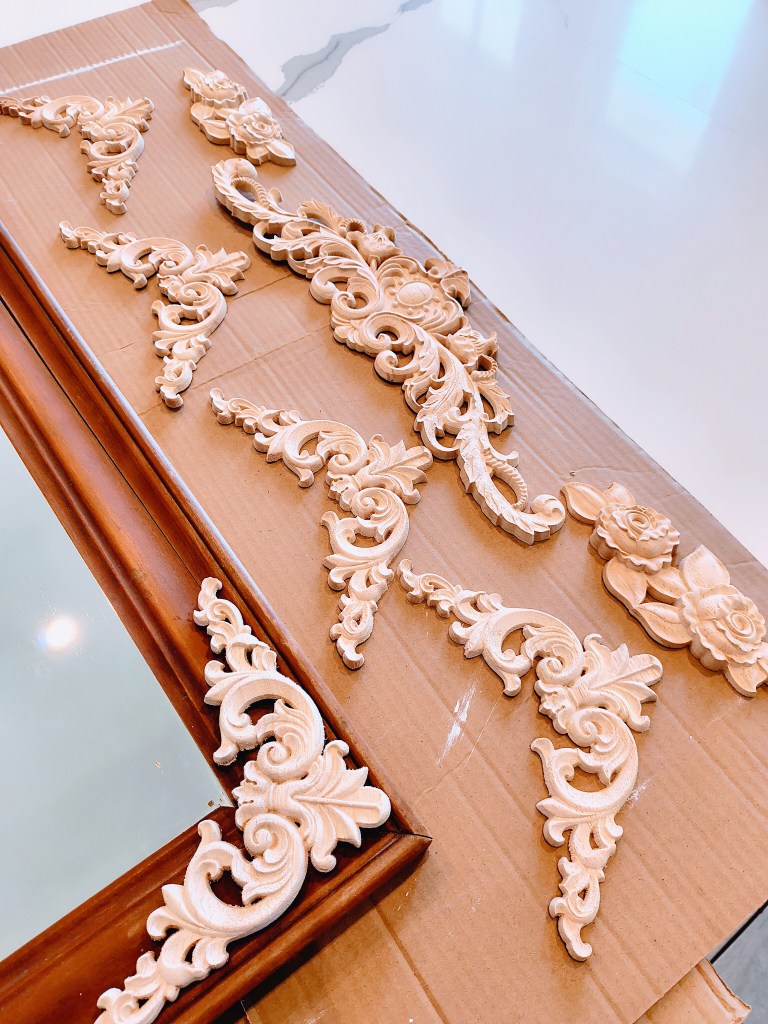
I found a very lovely set of wooden appliques, or onlays, from Amazon. This set is offered in a small or large size, and in sets of 5 or 10. I opted for size large, in a set of 10. This is enough for 2 projects, should I desire. (The rose appliques are for another project up the line, and not included in the set of 10 I used for this project.)
The detail on these appliques is very intricate, and they are a good heft, as well. They are lightweight, but not so thin that they are too fragile to work with. Just perfect!
Now, as I was sorting through my appliques and getting ready to paint them, Willie went to work attaching the French Cleat Picture Hanger wall bracket set that I found on Amazon as well. This gadget was a life-saver when it came to figuring out how to hang this very heavy mirror. The mirror was originally attached to a dresser, so there was no original wall hanging hardware.
It seemed very easy for him to attach two of the brackets on the back of the frame, and then the other two to the wall, and they just slip one inside the other to hang. Fabulous!
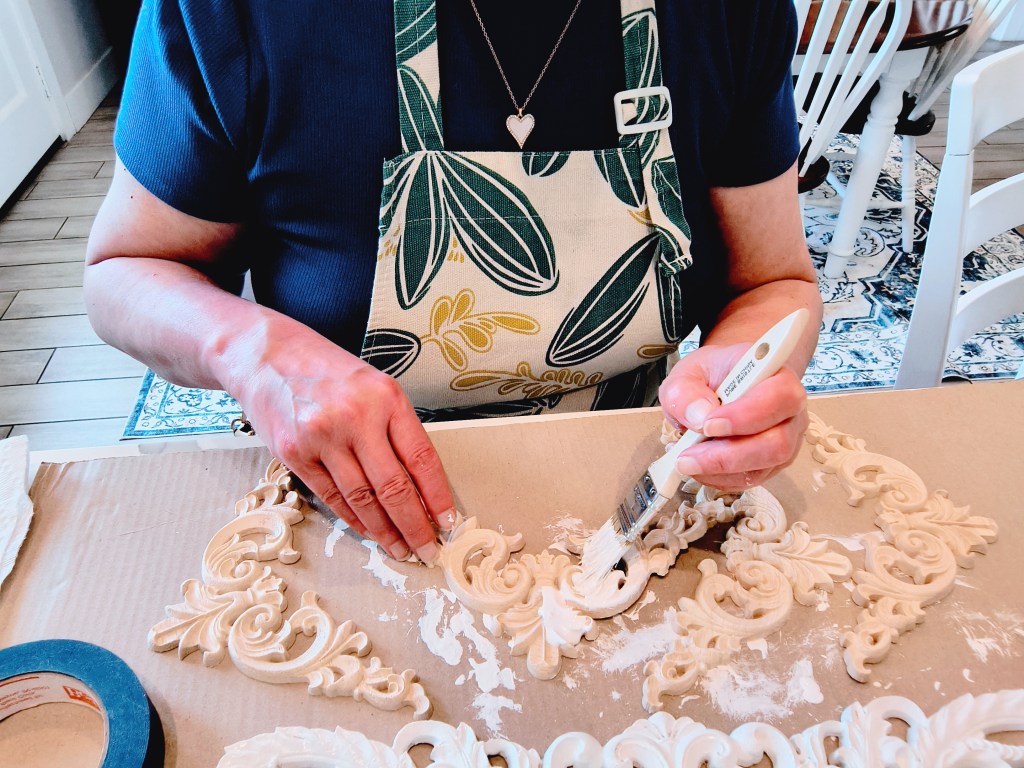
I had a lot of fun painting the wooden appliques. I first painted them white, and then I went over them later (after they had dried), with a gold metallic paint, just sweeping it across the raised details.
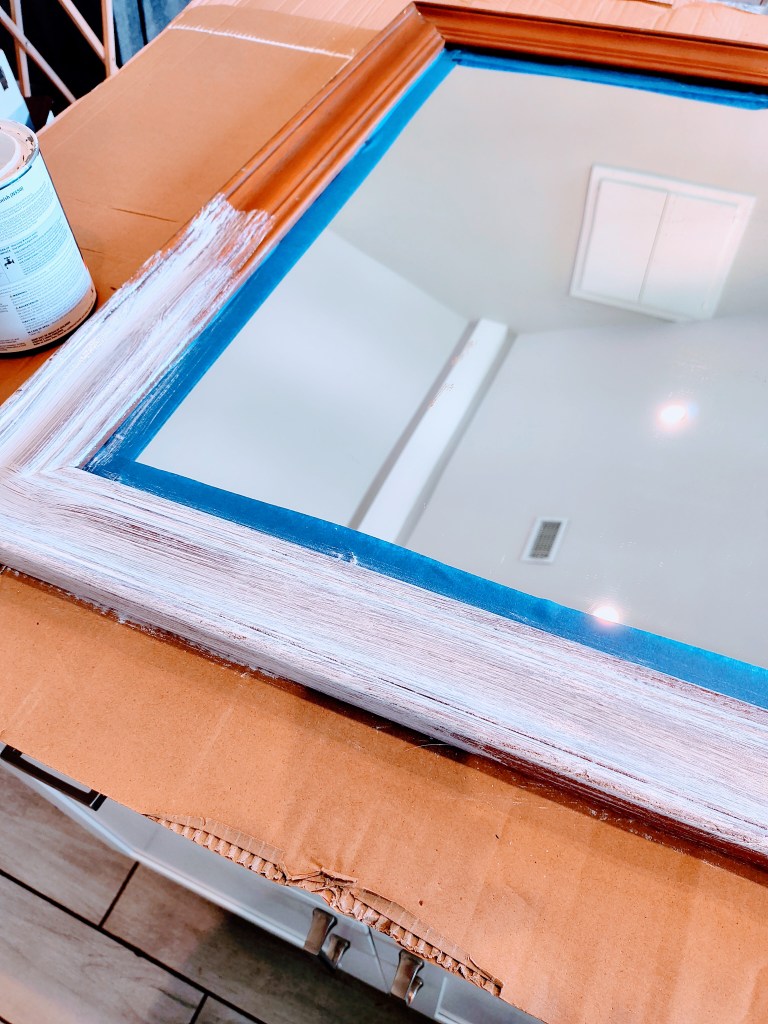
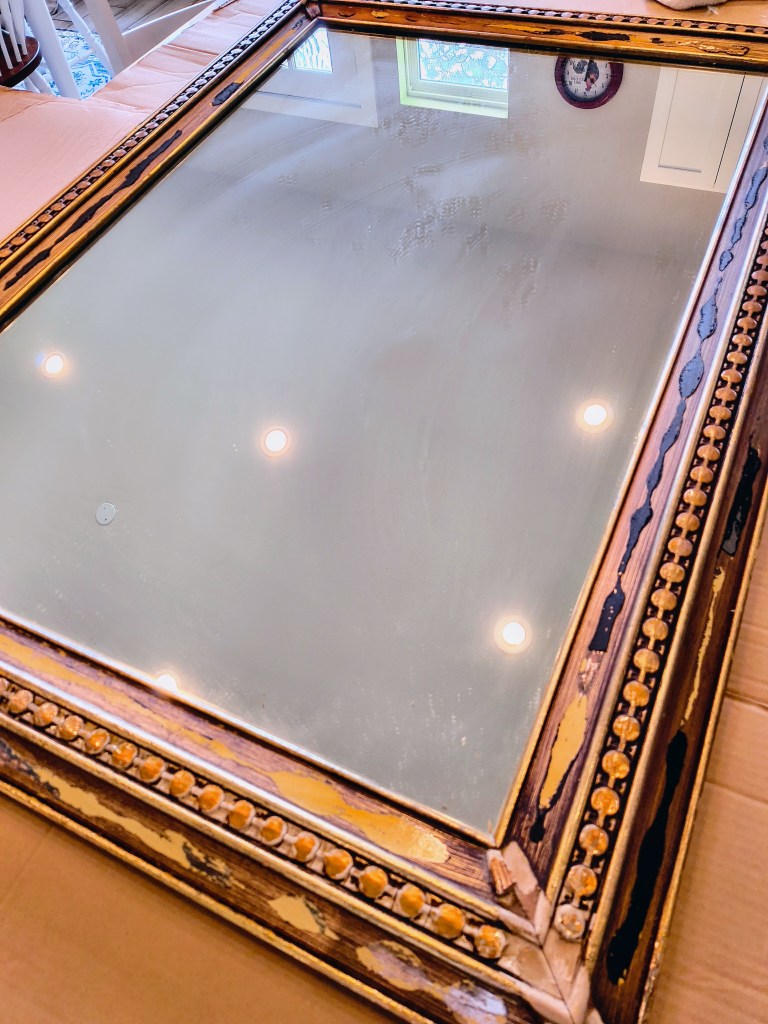
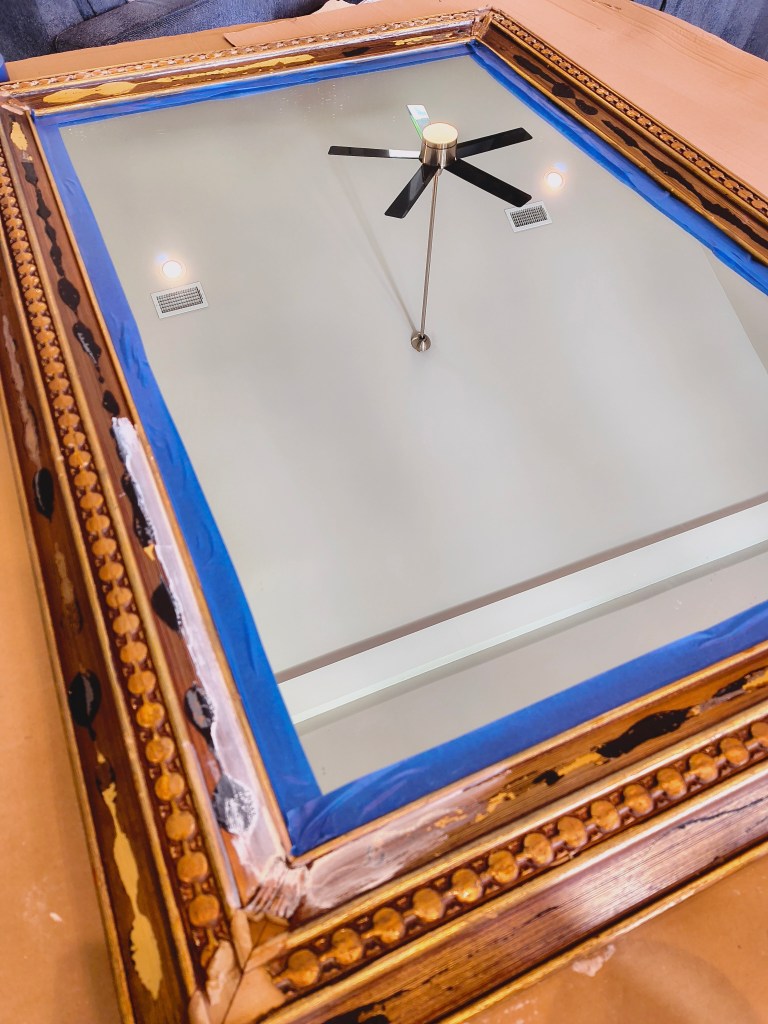
After I had painted the appliques, I got to work painting the mirror frame. I first taped off the mirror using painter’s tape so that I would not get paint on the mirror itself. This is very easily removed after the paint dries, and it makes a big difference in getting a sharp edge on your paint, next to the mirror.
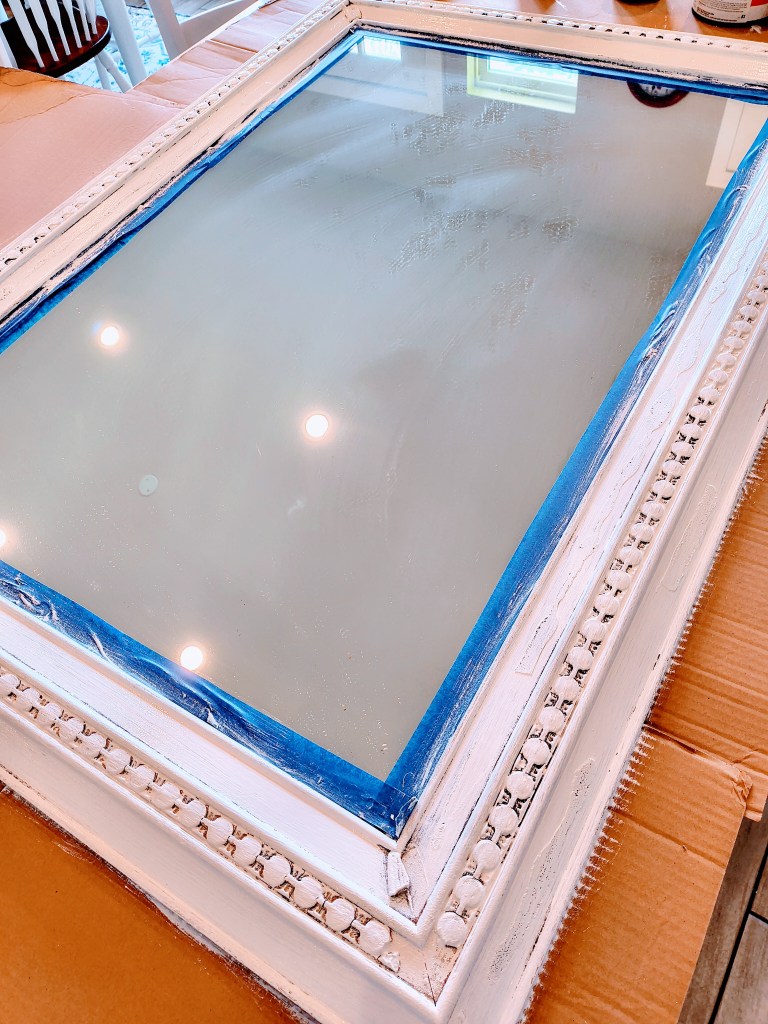
When I began painting the mirror, I wasn’t sure how I wanted it to look. White-washed? Fully painted? No… this has to look like it’s been around for centuries. The paint has begun to chip. That’s the ticket!
I began with a top coat, then I went back over it (in sections) with another coat. I let that second coat dry just a bit, till it was almost dry, then I rubbed across it with a slightly damp paper towel. Since I left the original varnish on the mirror, it was a little “slick” underneath my new paint, so I was able to get my (almost, but still not dry) second coat of paint to literally peel off on some of the raised areas, allowing the original brown color to come through. Since I wanted it to look like the paint has organically chipped off over time, I did not want any white-wash smudge, so I took another damp(er) paper towel and wiped the brown areas to bring back the original sheen.
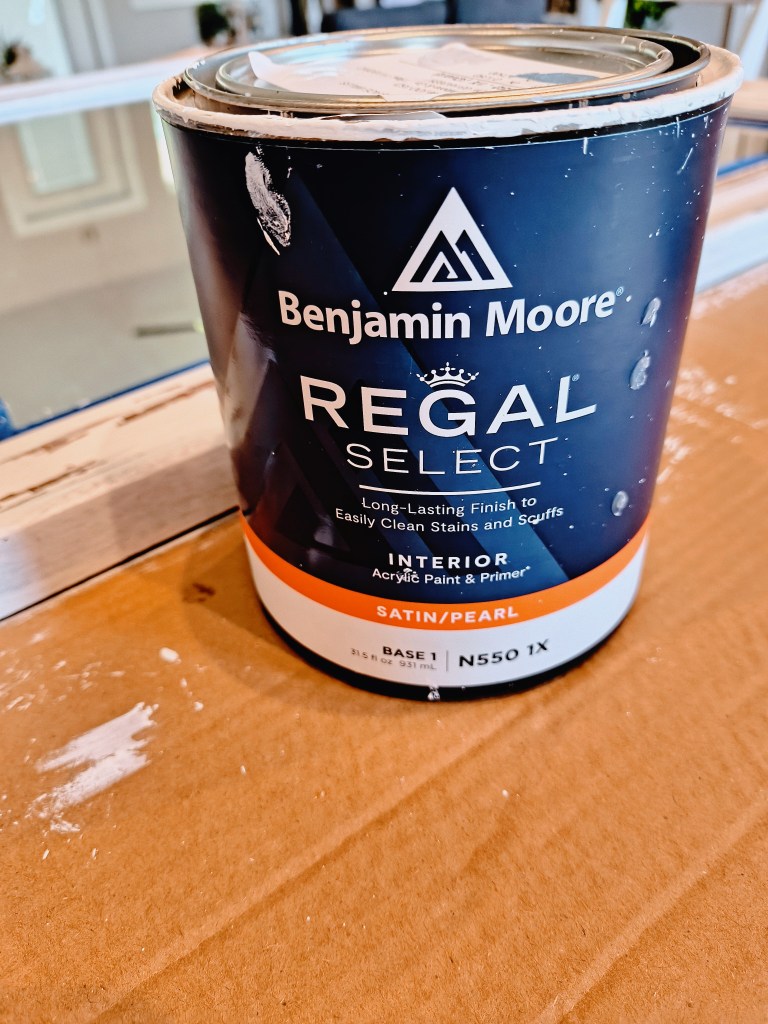
Here is the type of paint I used by Benjamin Moore (not sponsored). I’ve been using this same paint for all my recent projects. It has been wonderful to work with for all my paint effects. It is an Interior Acrylic Paint and Primer, in a Satin/Pearl finish. It’s not shiny or iridescent, as the name would make one think.
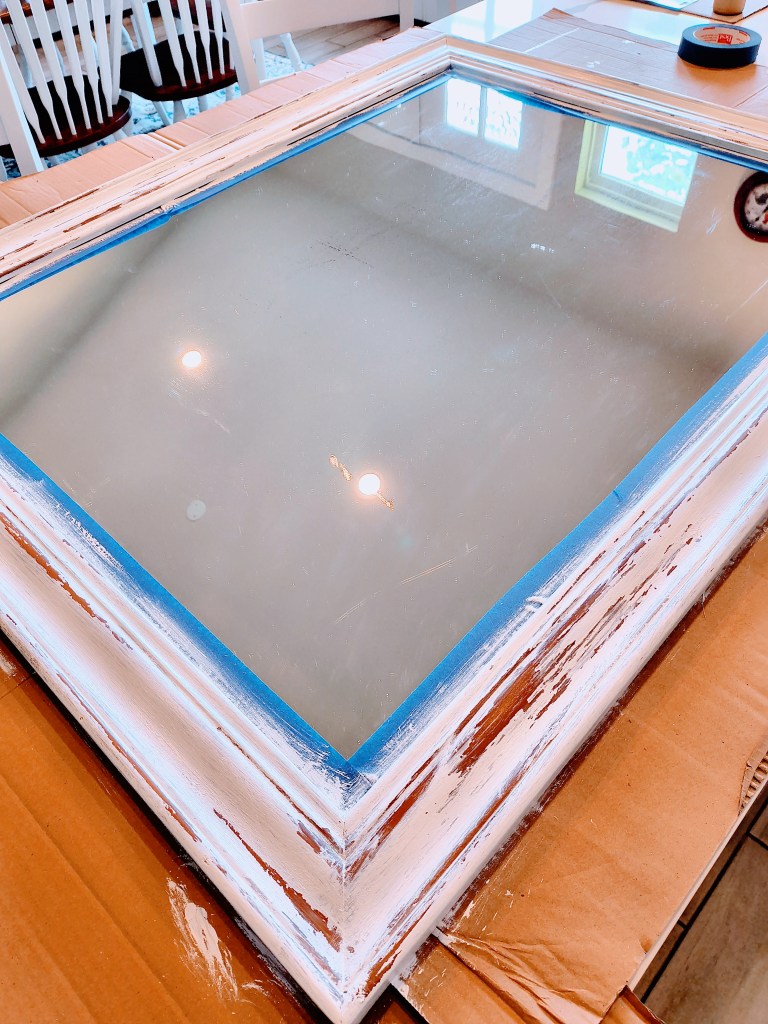
I completed the entire mirror, using this method, one side at a time. It really doesn’t take that long to do, and is quite fun!
If I “messed up” I would just paint back over the area and wait for it to get almost dry, and rub away again. Only one area, right here in the above corner, gave me any trouble. I just couldn’t seem to get it the way I wanted, but it came out fine in the end. Probably no one but me would even notice. It’s supposed to be old and organically chipped, right?
Now jumping ahead, I used FolkArt Acrylic Paint in Pure Gold (from Amazon) to highlight the inside and outside edges of the mirror, as well as highlight all the raised areas of the wooden appliques.
I then glued on all the wooden appliques. Hot glue works best, in my opinion. I first used super glue, but one corner came off after hanging, so hot glue to the rescue!
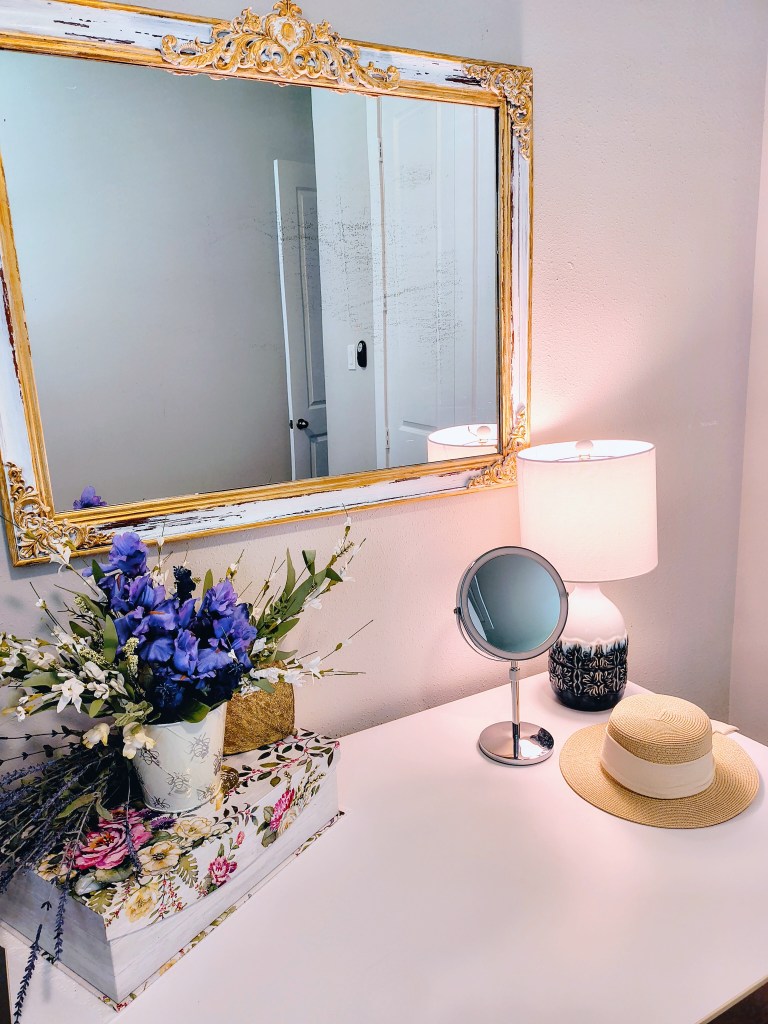
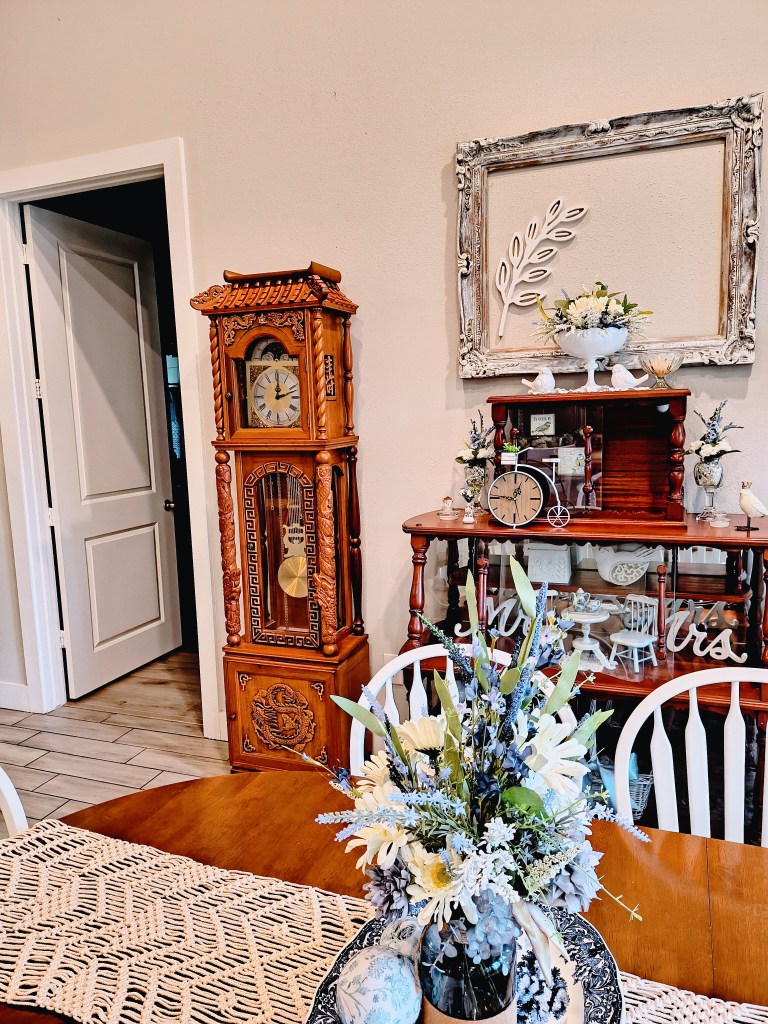
I just love it. This is my favorite decor makeover that I’ve done thus far, and I love it now hanging over my makeup table in my office.
I hope my salvaged project inspires you to create something fabulous for your space.
Till next time, be kind, and always follow your joy! God is truly good!
Johanna and Willie
acrossthelake.blog
DIY Home Decor Paint Project, Venetian, Venice Inspired Mirror Makeover, Salvaged, From Trash to Treasure Home Decoration, Vintage Mirror Upcycle, Conroe, Texas, Lakehouse
It has certainly been rainy lately here in SE Texas, and I am loving it! Such a great reprieve from the heat, and a great time to do indoor crafts.
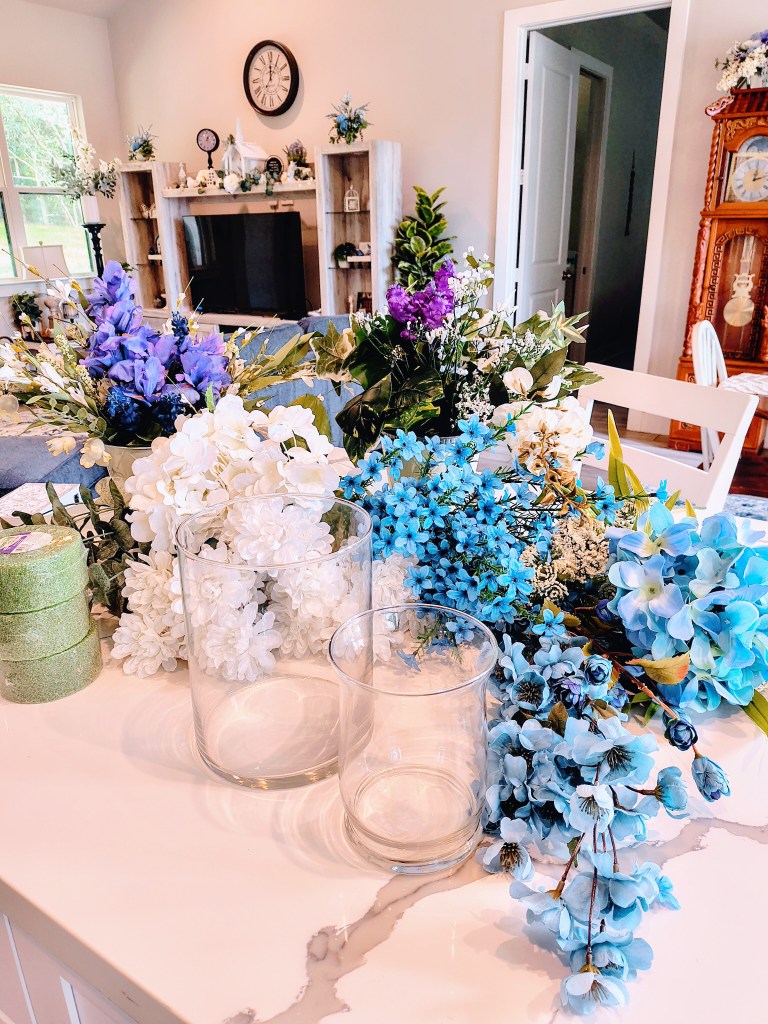
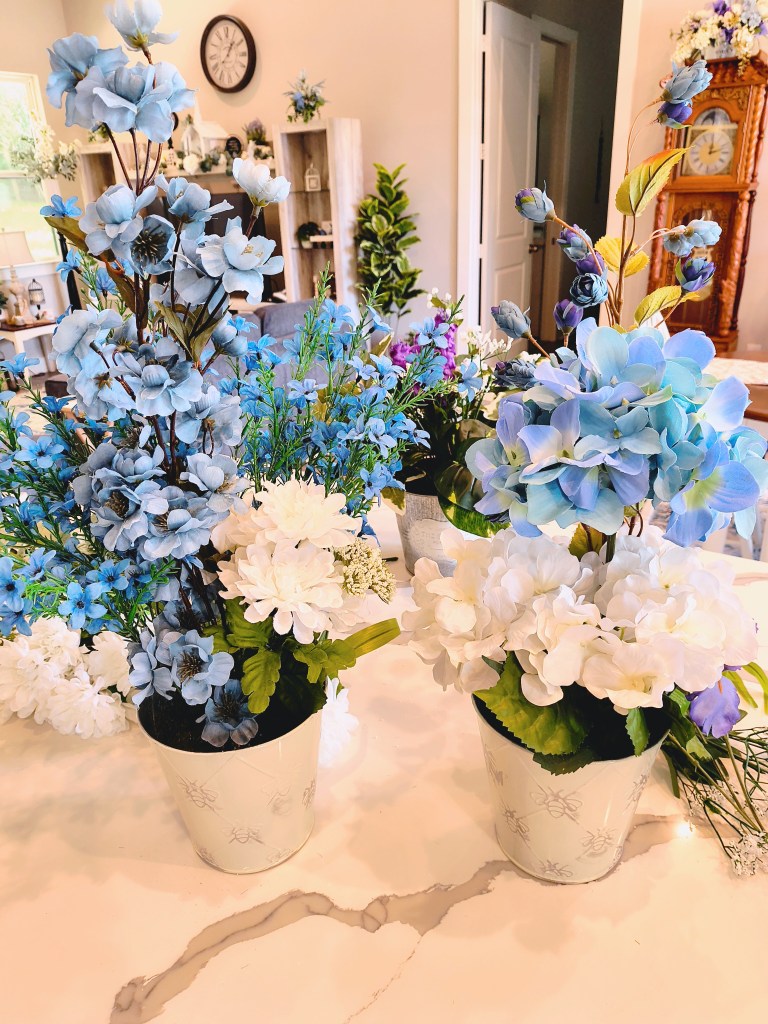
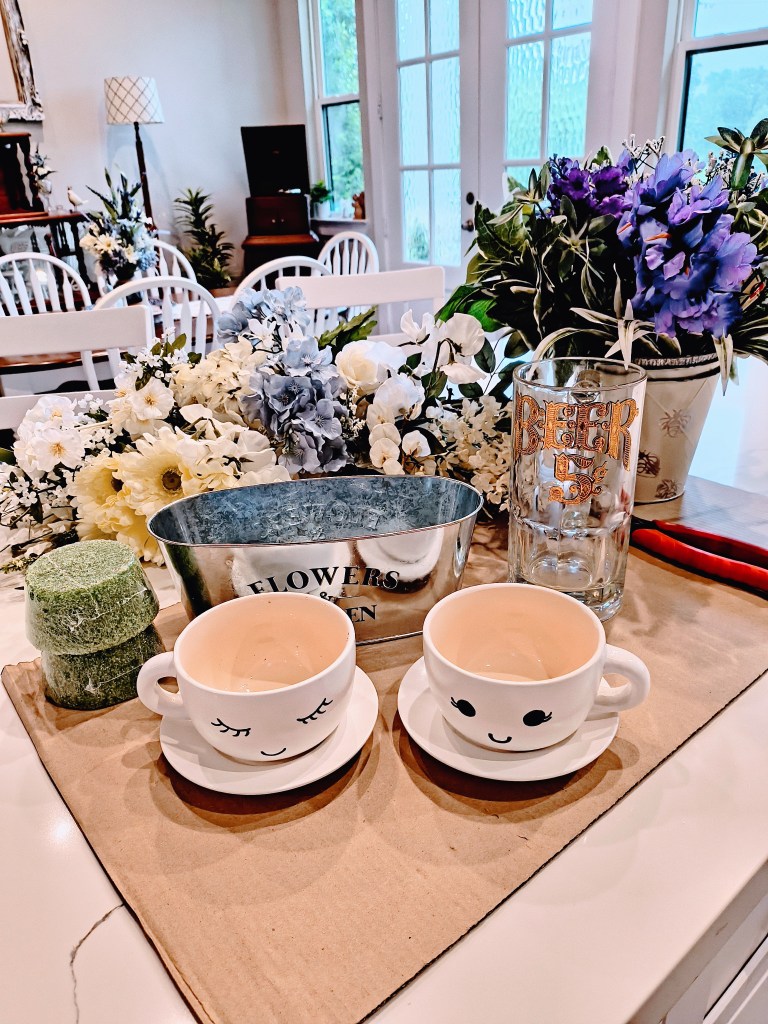
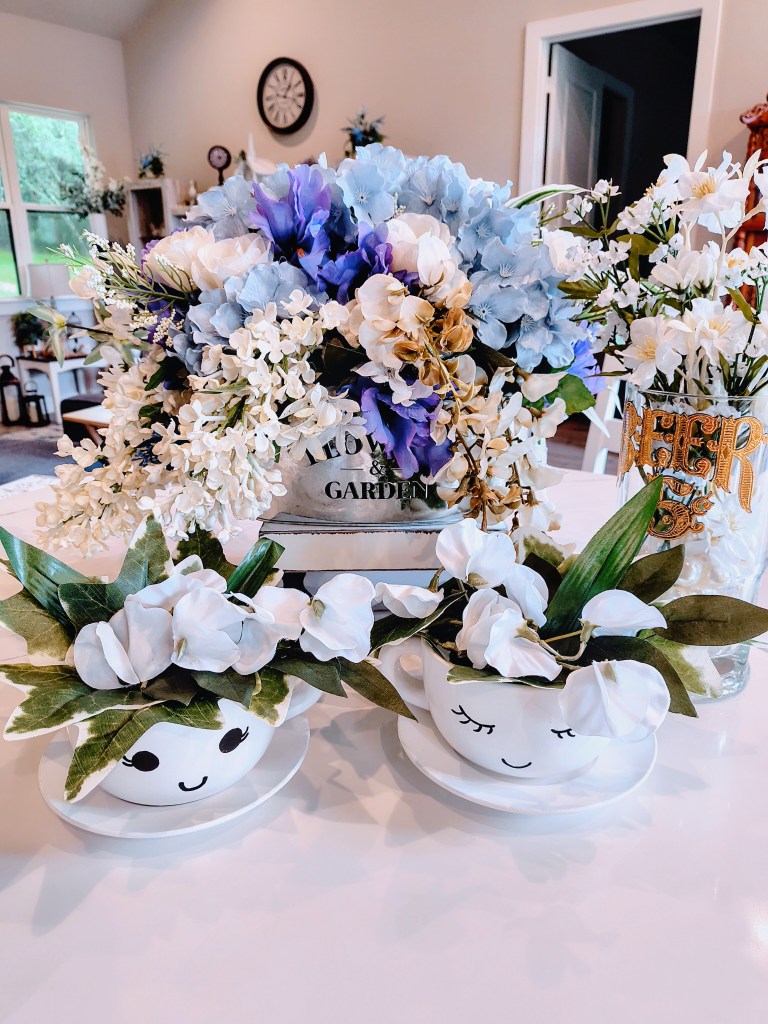
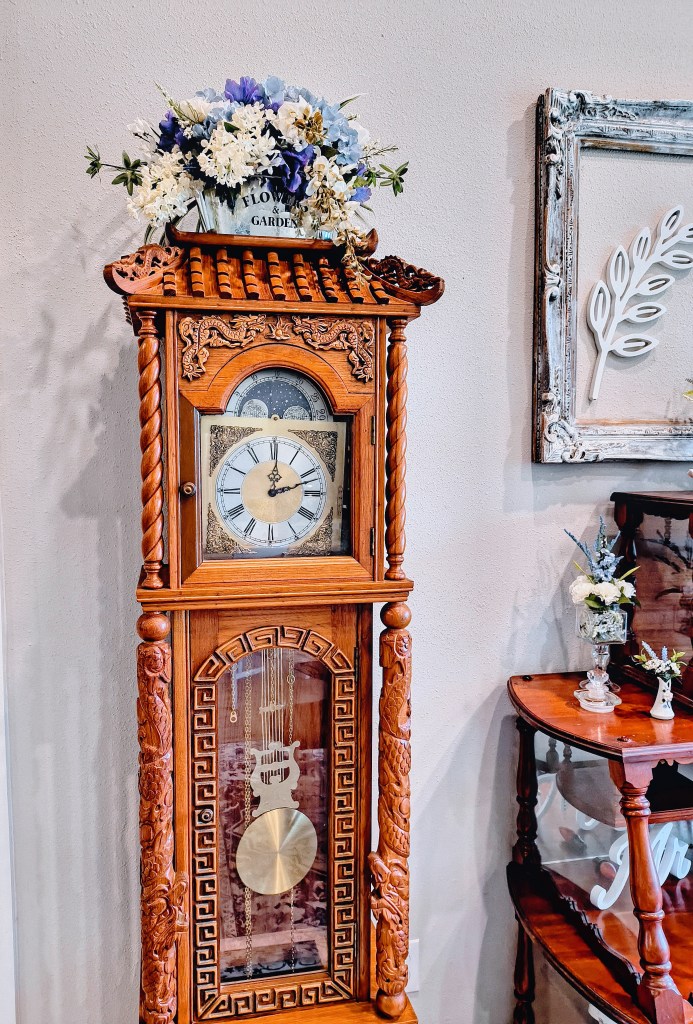
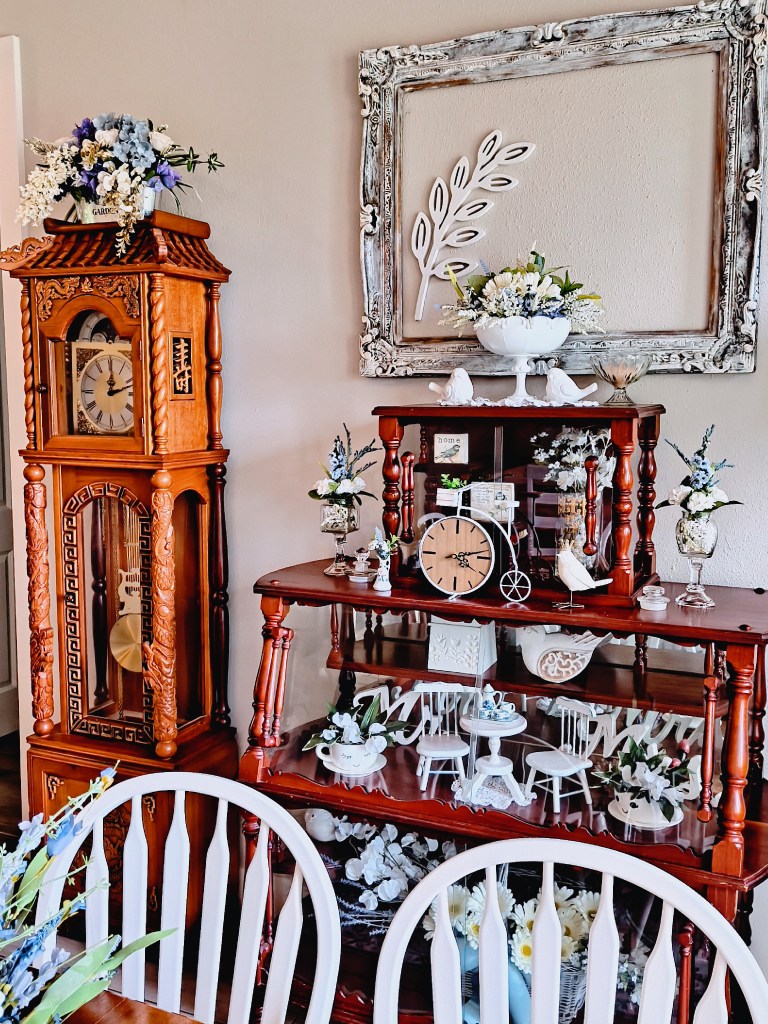
I had 4 floral arrangements in mind that I wanted to create for our dining room decor. One for the top of our grandfather clock, one for the top inside tier of our antique curio cabinet, and 2 for the second inside tier of the curio cabinet.
I already had 3 of the “vases” here. Two little cute coffee cup planters that I painted several years ago, and a large glass mug that says Beer 5 cents, that was given to Willie by his younger brother, Thomas, many years ago, before we even met.
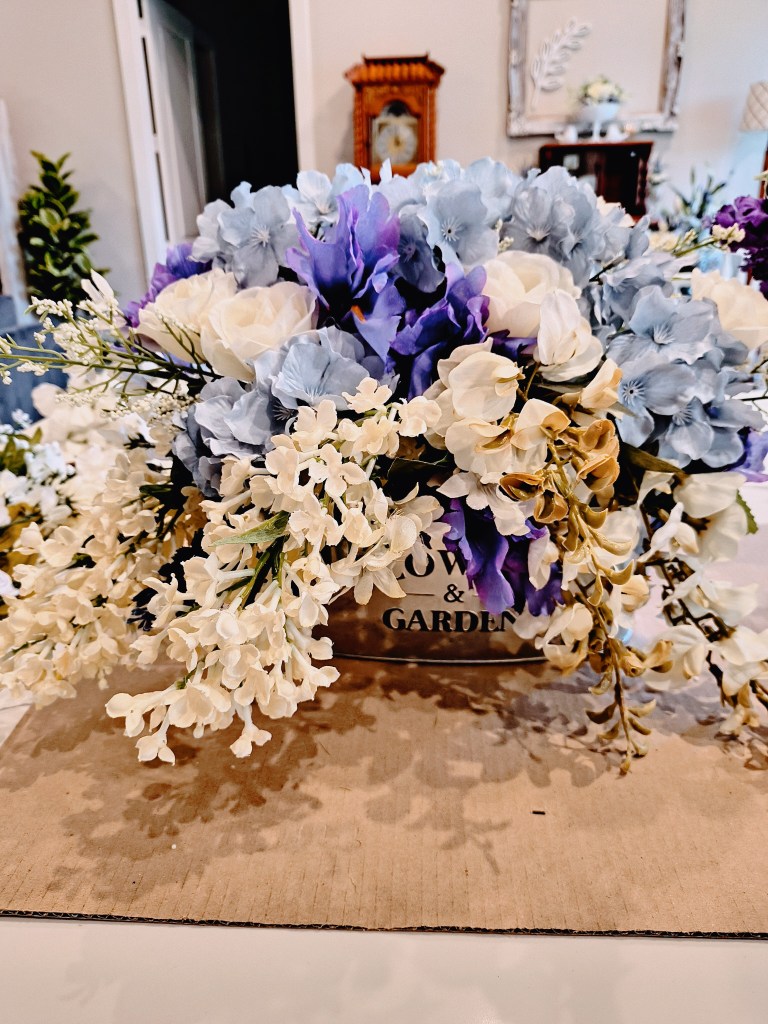
The fourth vase, or planter, I found at Dollar Tree. I knew I didn’t want or need a pricey vase, as this arrangement will be going atop our grandfather clock, so it will not be well seen, plus it wouldn’t be tragic if it had an accidental fall from high up. This tin bin that says Flowers & Gardens is perfect. The perfect price point, height, and shape for this task.
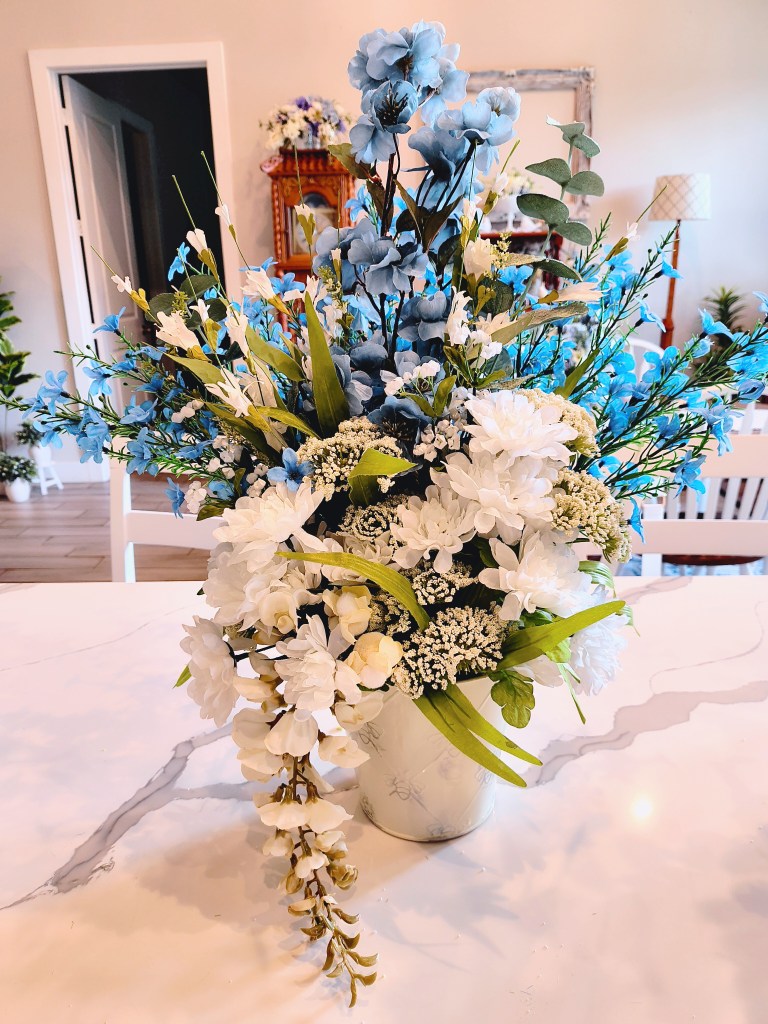
I knew that I wanted the arrangement for atop the clock to have some downward flow.
I began with just blue and whites, but it needed a pop of color. How about a pop of purple?
There we go! I’m loving this!
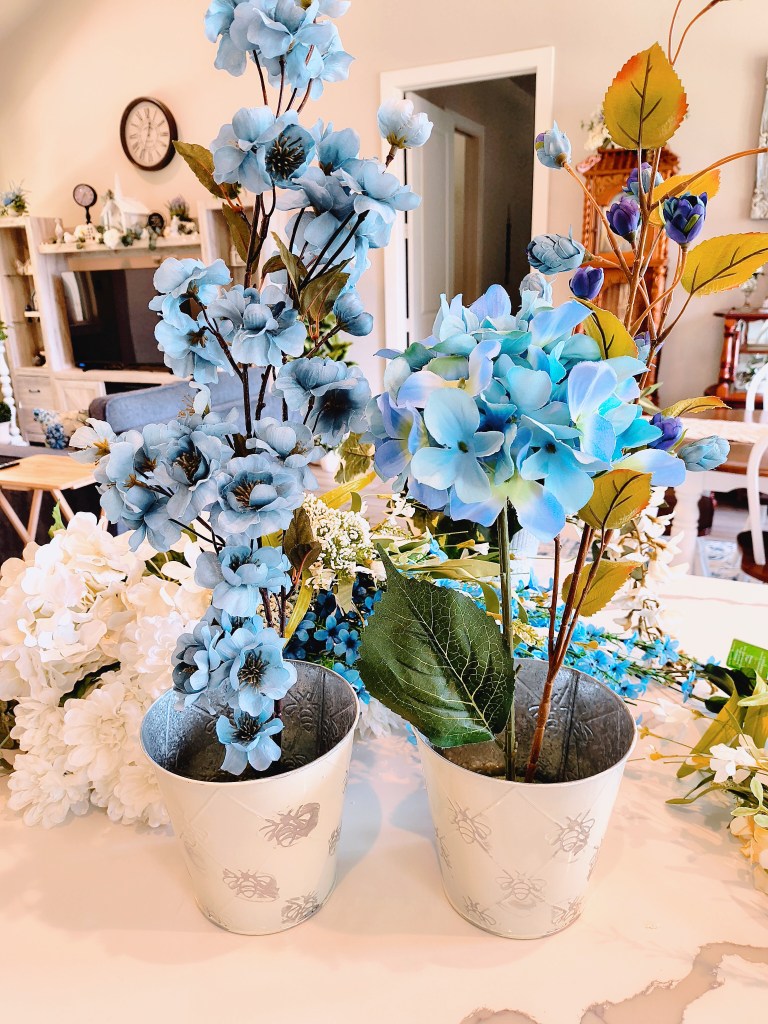
The little cuties and beer mug had their makeovers as well. I kept these pretty simple, as they are going behind glass, in the curio cabinet. The white florals will help bring in much needed brightness.
The little mugs are just too cute! I call them Fifi and Penelope. They’ve become favorite keepsakes.
The beer mug now shines new light with it’s white wispy florals, pearls, and clear stones.
Such a beautiful way to add brightness (and lightness of mood) to this dark cabinet.
Fun note: If you spy the red Christmas light inside this cabinet, it’s there because Willie’s Father built this cabinet when he (Willie’s Dad) was in his 20’s, probably in the 1960’s. I’m guessing this was his way to bring brightness in. These lights are so fun and sentimental, I’ve opted to leave them in place, as he placed them in his beautiful creation.
And for our arrangement atop the clock, I think it ties everything in together very well.
Everybody’s happy now in their new home. We’re making good progress with the dining room and curio cabinet decor.
Till next time, be kind, and follow your joy! God is truly good!
Johanna and Willie
acrossthelake.blog
Faux Floral Arranging, Floral Arrangements, Vintage Style, Antique Furniture, French Country House, Lake House, Decor, Decor DIY, Keepsakes, Upgraded Home Decor
So, we’ve been on the look-out for mirrors for Royalview for a little while now. I, in particular, have been keeping an eye out for a full-length mirror for our bedroom, as well as a mirror for my office/make-up room.
The price tag that comes along with a beautiful large mirror is pretty large as well, we’ve noticed, so when I spotted this beauty at one of my favorite booth’s at Yesterday’s Treasures, I was definitely interested, and when Willie told me the price, I was sold. ($25.00)
It’s not quite the look and style as Royalview’s decor, as I’m sure you’ve noticed, but if you’ve been following our story here for a bit, you know I’m up for a challenge, armed with my can of white paint. So, yeah, after giving it a good look-over, I said, “I can paint it white!”.
It was listed as a Western Motif Mirror, and it does have some pretty designs. The frame is very large and ornate, so definitely something I can work with.
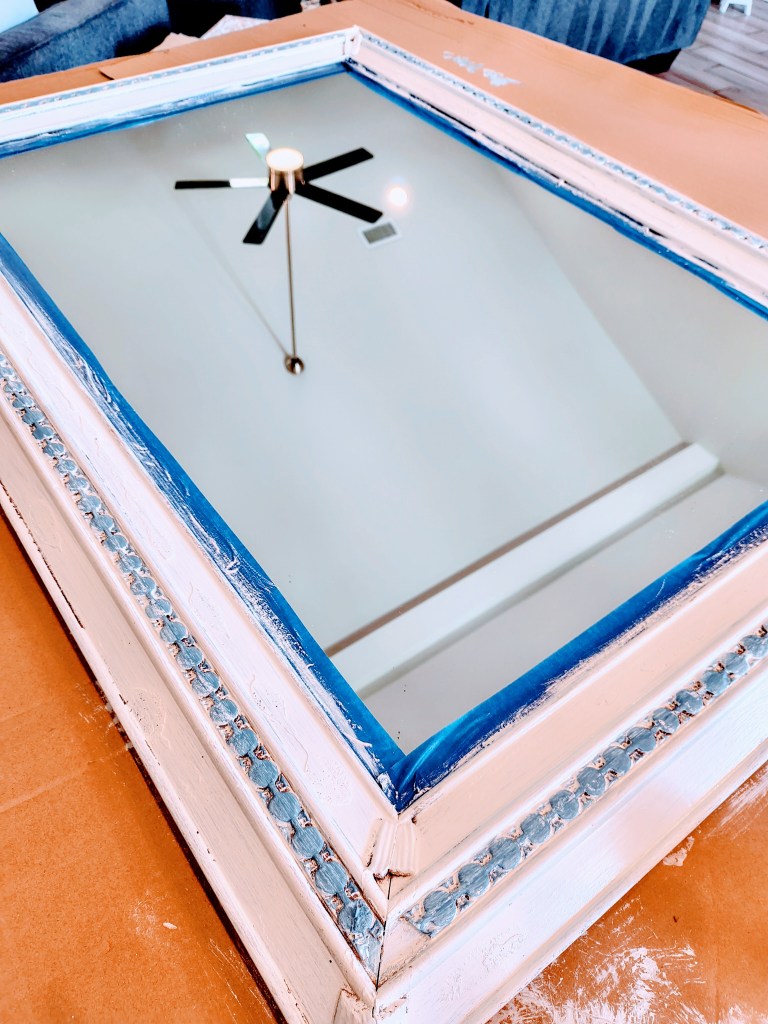
For this project I did need to get the painters tape out and fully line all sides of the mirror to make sure not to get paint on the mirror itself.
I decided not to sand this, even though it seemed to have some type of varnish over the paint, and with 2 coats of white paint, the old brown, black, and gold tones were a distant memory.
I did allow some of the old tones to show through, to let it still have a vintage look, but this time I took things to the next level by adding blue paint to the little circle details. At first I was going to paint each one perfectly, but then I decided it would be better to give it an imperfect, distressed look.
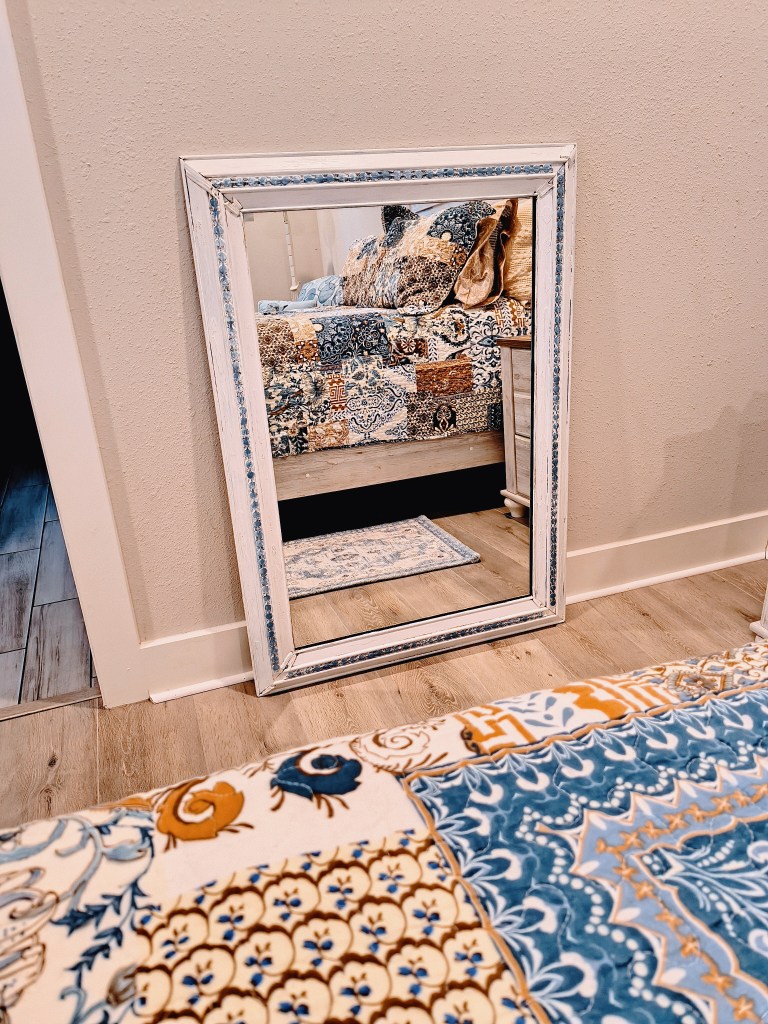
I’m very delighted how it turned out. It was a very easy project to do. The mirror just needed to be cleaned a bit and painted. It has a lot of character, and a new life now at Royalview.
The toughest things about this project came after completing the makeover: Deciding where and how to hang it.
The how to hang it has now being taken care of thanks to Amazon. I found a French Cleat Picture Hanger Kit that we will be trying out here very soon. This mirror weighs in at approximately 25 pounds. Yes, Willie weighed it. It feels much heavier to me. The kit(s) I found have different sizes for different weights. This is going to make hanging it so much easier and safer.
And for the where. My initial thought for this mirror was definitely for our bedroom wall.
This is large enough to use as a full-length dressing mirror, but after I painted it, I looked into the living room and thought how beautiful this would be over our main sofa (hung horizontally). The wall over our sofa has been kept blank till we find the “perfect” item, or items to adorn that focal area.
I don’t know for sure yet where it will find it’s place.
I do have two more vintage mirrors that are awaiting transformation. These two I got for free, rummaging through one of the buildings at Willie’s family’s business that’s being cleared out.
Here are the two lovelies.
Think I have my work cut out for me?
I know there will be a lot of cleaning involved, for sure!
But, I do have some ideas, and I’ve ordered some things already for these, including the French Cleat Hangers, of course. The brown one is off of a dresser, so it definitely will need hardware to hang.
That yellow mirror is so pretty, though. That one will either be in my office (the brown one will be over my dressing table in my office/make-up room) as a full length dressing mirror, or in our bedroom if the other goes over the sofa, so stay tuned!
I’m just so happy to be able to breathe new life into these almost lost mirrors. They are all good-sized mirrors, and in good shape mostly. I’m hoping once the dirt is wiped from these last two, that the mirrors themselves are good. From what I can see, they look like they will be ok.
Okay gang, till next time, please remember to be kind, and always follow your joy!
Johanna and Willie
acrossthelake.blog
Vintage Mirror DIY Paint Makeover Project, French Country House Decor, Lake House Decor, Conroe, Texas, Arts and Crafts
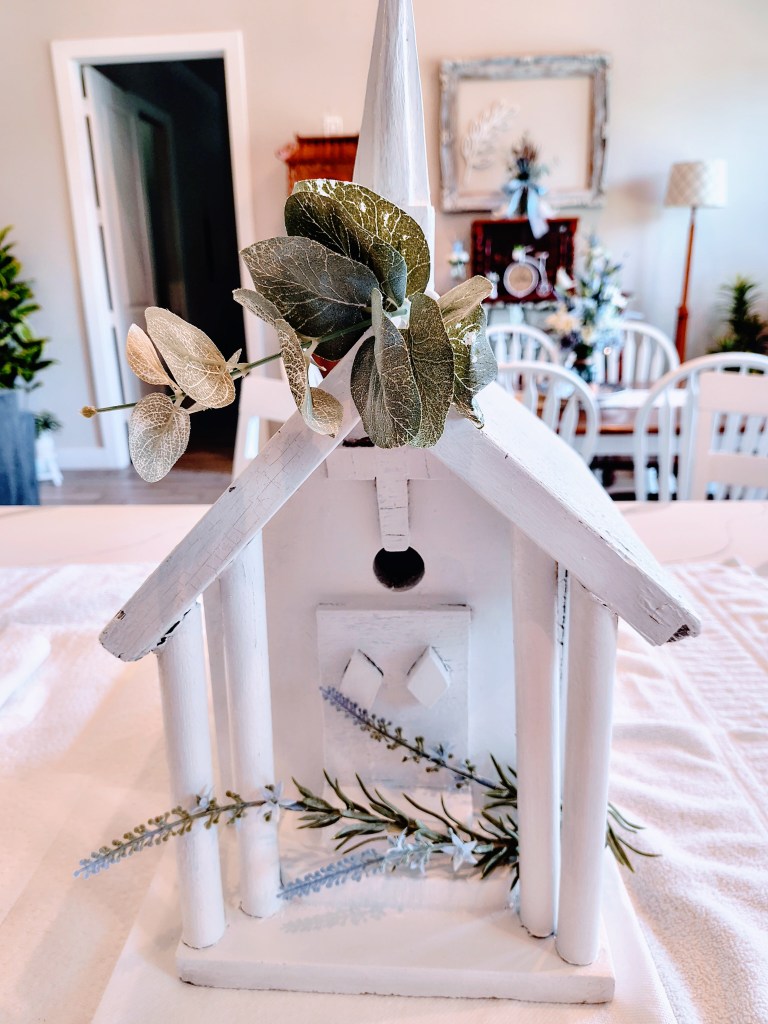
I actually saw it just a little while back while visiting Yesterday’s Treasures in Willis, TX. I first saw a historical church that this little birdhouse resembles, in New Waverly, TX. It is so beautiful. It’s named St. Joseph’s Catholic Church.
Soon after that I saw another historic church like this in Willis, Texas. I really love the style of architecture, so when I spied this little church birdhouse, I was immediately intrigued.
I came across a similar church birdhouse elsewhere, but the price was quite a bit, and when I saw the one I eventually purchased, the price was very good, but I wasn’t sure where I could use it in my decor.
Well, I woke up Saturday morning with the little church birdhouse on my mind, and we were headed out on a shopping adventure with Aunt Bunny that day anyway, so I decided to see if it was even still available, and, thankfully, it was.
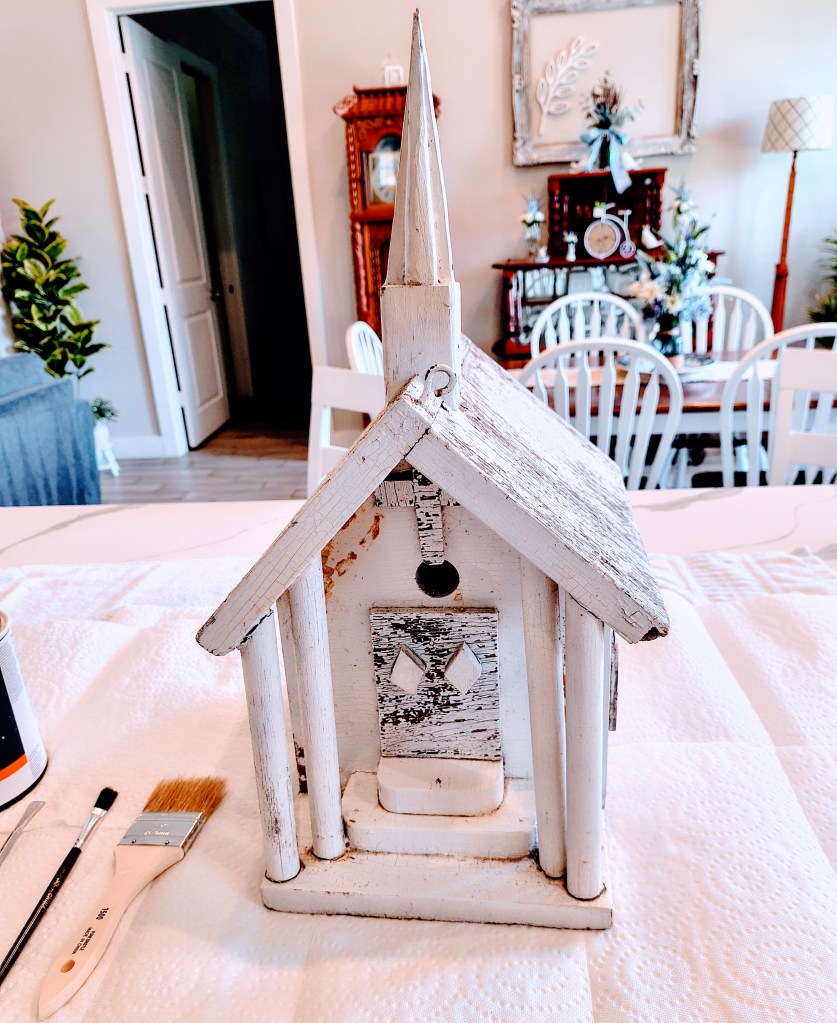
When we went to pick it up, I didn’t realize the actual condition that the house was in, as I hadn’t fully examined it the first time. I decided to go ahead and purchase it as the price was good, and I knew I would have fun fixing it up.
This picture is after Willie cleaned it up a bit outside and removed the dirt dobber nest that was on the front facade. This birdhouse was evidently used outdoors as an actual birdhouse, and not for home decor, so it is the real deal. But this real deal needed a little TLC to get it to where we would want to display it indoors at Royalview. I do like the rustic, whitewashed look, but this was a little intense, even for me.
So, after giving it a good wiping down with damp paper towels, I got my water based white paint out once again to see if I could improve on the looks.
The paint went on easily, and while it still has a worn look, it is much fresher now.
I added a little faux floral to give it even more charm.
I’m very happy with the outcome. It’s amazing what a little bit of paint can do.
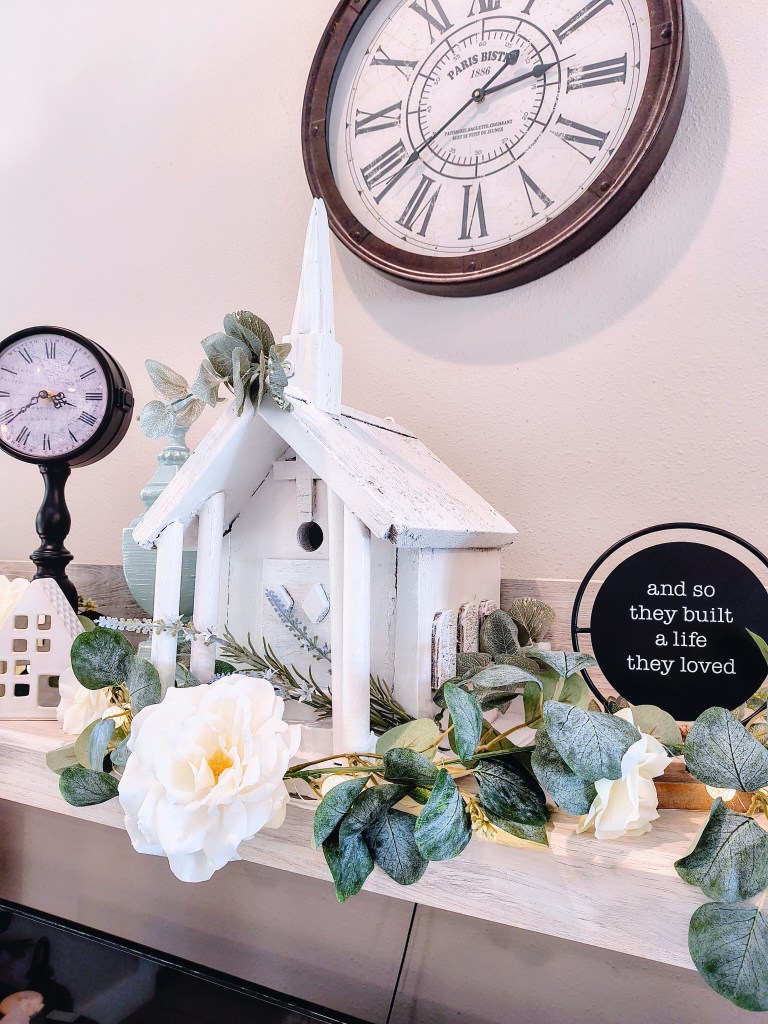
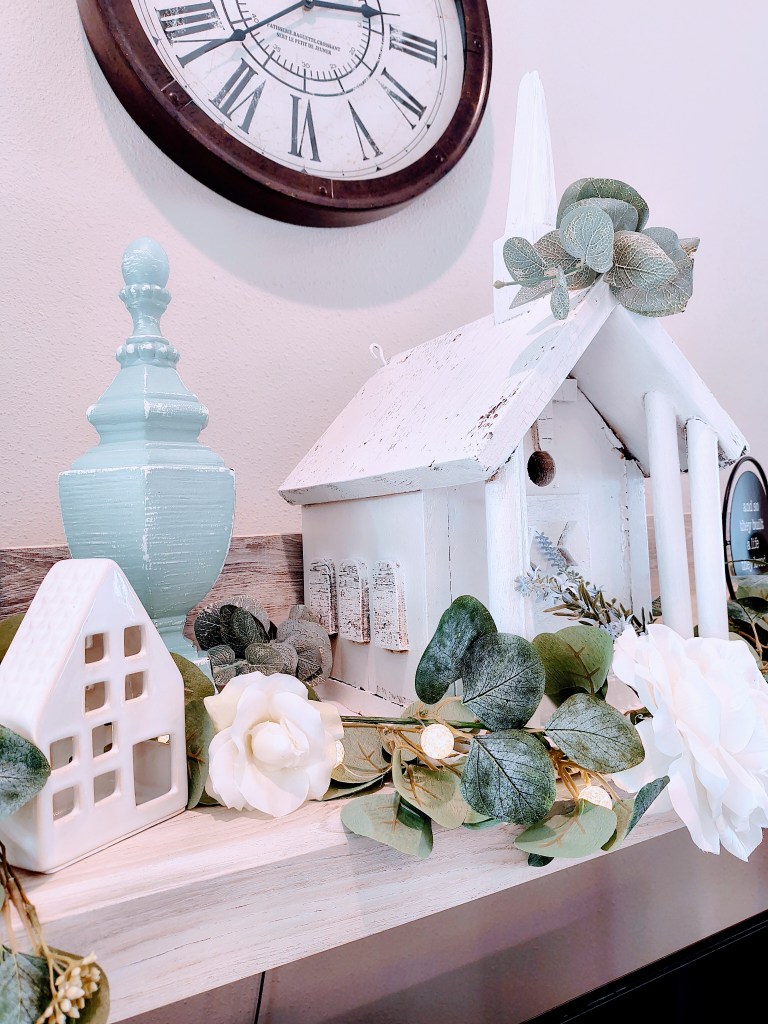
After completing the little birdhouse’s transformation, I thought it would be perfect as the focal point of our entertainment center’s vignette. So, yet another swap-out of decor! But that’s the fun of it!
So cute! And adds so much charm. I’m really loving it. It still has a rustic look, but not quite as shabby as before. Now I suppose it is shabby chic!
I hope you’ll stay tuned for our next blog post. We enjoyed another fun dining and shopping adventure with Aunt Bunny.
Till next time, and I usually say stay safe, and I always will hope so for you, but this time I am going to sign off with a message that a little kindness can go a lot further than you can even imagine. God is truly good.
Johanna and Willie,
acrossthelake.blog
Vintage Church Birdhouse, Bird House, White Church, Shabby Chic Home Decor, DIY Decor Transformation
Everything is still a work in progress here at Royalview, but it’s getting cozier and definitely feeling like home, more and more every day. I’m getting to where I do not want to leave. I want to stay home. Royalview is now definitely in my heart as home.
It’s been so much fun shopping for home decor, as well as doing my little crafts for things around the house. Royalview’s decor has been a “from scratch” project. Our decor theme and color scheme is completely different from our former home of 31 years. It’s been a great adventure for me to start from scratch. All new feel, all new memories.
Our entertainment center decor has been in constant evolvement. As we find new goodies, we’re always moving things around to see where they look best. The top of our entertainment center has now inherited the floral arrangement that I made to go in the dining room atop our antique curio cabinet.
I put this floral arrangement together in a pedestaled white milk glass bowl I acquired at Yesterday’s Treasures Antique Mall in Willis, TX, as I did the cute black two-faced clock pictured here. Not sure yet if this will be where it (the floral arrangement) stays, but it’s here for now. Still deciding…
I found the white rose garland at Michaels, and I love how it ties everything together. I intertwined the garland with a strand of battery powered little ball lights. You can see them better in the closeup photo.
And, I’ve not yet introduced you to our wall clock, Cinderella. I found her at Yesterday’s Treasures Antique Mall upon our very first visit there, and knew immediately that she had to come home with us.
Cinderella is a Mora style wall clock painted in white and gray. I did not give her a makeover. This is the way I found her and loved the look. She was actually the inspiration for the color that I painted Beauty (the tall candlestick holder). We have very high walls, so she goes perfectly, with her very tall stature.
I found a similar clock in style and color on Amazon for any who may be loving this style as much as I do. It’s a Howard Miller Lebanon II Wall Clock in Antique Gray. (I will be linking more similar Amazon finds here for all of you, for items I have acquired elsewhere that may be 1 of a kind as far as where I’ve found them, as I do receive requests from folks wanting to find similar items for themselves.)
And, for the promised look at the little house clock that I found at Hobby Lobby and repainted, Here it is:
Willie also installed new clock works and hands. Here’s the before picture:
Such a fun and easy little makeover project, but it did make a big difference. I really like this little clock. It gives me birdhouse vibes.
We both really do enjoy it. It’s very nice to see the action on the screen so well, and we love that we can watch our DVD’s very easily without having to switch back and forth. The DVD choice is located on the menu with all the other apps. This Amazon purchase was so fabulous also because they brought it here and set it up for us. That was very helpful.
We’ll be off on another antiquing spree with Aunt Bunny, coming up very soon. We’ll see what other treasures are to be found. My sights are now focused more on decor for my office and for our bathrooms. I’m so excited my new desk has arrived (from Amazon, of course). Willie is working to get that all put together as well as a storage cabinet for our utility room. There’s always some type of project going on over here, and we’re loving it!
Till next time, stay safe, and follow your joy! God is truly good!
It’s been a lot of fun shopping and deciding what items to put on and in our antique curio cabinet handmade by Willie’s Father. I definitely knew that we needed bright items to contrast the dark mahogany wood. I also wanted to go with fun and whimsical items.
A few of the recently added items are the cute little bicycle clock, the miniature table and chair set, and the wicker basket.
Each of these items needed a little TLC to get them ready for display.
The first to get their makeover was the little bicycle clock. We found this at Hobby Lobby on the Clearance aisle. It’s so awesome. I told Willie that I really wanted a white bicycle to go in our cabinet, so when I spotted this bicycle, I was overjoyed.
As you can see, it was originally black metal, and the clock had no hands. I saw this as a fun project for us, and I love that it is an old fashioned style bicycle. This was a happy surprise find.
With just a quick touch-up of white paint on the metal and wooden parts, the only thing left to do was to replace the clock-works. We found clock workings sets at Michaels for both this bicycle clock and a little house clock project. I’ll show you the little house on a later post.
Willie made quick and easy work of replacing the clock works, and there she is, so pretty and now also working. I cannot remember exactly what we paid for this clock, but I think it was less than $5.00, because it didn’t work, so yay!
Next up are the miniature dining room table and chairs and wicker basket, ready for their makeovers.
We got the miniature wooden table and chairs set at New Waverly Antiques and Collectibles, and the wicker basket was brought with us from our former home.
I dreamt about the wicker basket painted white with lavender flowers inside, like someone had been out picking them. So, that’s what I set out to accomplish.
Again, very easy to transform. I used a water based paint and did not put a lot on my brush. Just a light white washing.
I did not paint the inside, since I plan to fill it with faux lavender, which I picked up at Rosey Opals, in New Waverly, TX.
I love the color and texture of these ribbons. So beautiful.
And our finished basket with lavender project:
I’m very happy with the way it turned out.
And now we get to the little miniature table and chairs. I found these at New Waverly Antiques and Collectibles. I posted about our fun antique shopping day in New Waverly in an earlier post. You can find it here.
My new phrase currently seems to be, “I can paint it white.”, when I find something I love that isn’t quite the right aesthetic for Royalview’s decor. I like being able to find things that we both love, and transforming them. It’s so much fun, and makes for great memory making.
For this set, I added a touch of blue paint to give the pieces a little farmhouse charm.
Isn’t that little vase with flowers the sweetest? But…. I also found a miniature tea set while shopping at the Conroe Woodlands Antique Mall, and I couldn’t resist. It was a difficult choice, but I decided to go with the tea set on the table.
And here it is in it’s new spot in the curio cabinet.
I completed the look with a little doily that I found at New Waverly Antiques and Collectibles.
The basket found it’s new home on the very bottom of the curio cabinet.
We’re making great progress!
We just need to find some goodies for the very top. I’m thinking remote controlled candles, to bring in some light, and a couple more items for the side (angled) shelves on the bottom.
It’s all coming together a lot quicker than I thought it may, and I’m really loving the juxtaposition of the formalness and darkness of the cabinet, with the playfulness and lightness of the curated items.
Till next time, stay safe and follow your joy. God is truly good!
Johanna and Willie
acrossthelake.blog
DIY Home Decor Projects, Miniature Furniture Makeover, Whitewashing Projects, Paint Projects, French Country House Inspired Decorations, Whimsical Decor, Lakehouse Decor, Conroe, Texas