This is a project I had both been looking forward to, as well as being a bit shy to begin. Let me introduce you to Beauty, as we affectionately call her. Beauty has been with us for 20 years now. She was hand-turned on a lathe by Willie, and hand painted by me when we were working together as Studio 3B, creating wooden candlestick holders and candles.
Now that we’ve moved to Royalview and changed our decor, her burgundy and gold colors no longer fit in aesthetically, but I knew I’d never let her go, so she was slated for a complete transformation.
To begin, I used a soft grit sandpaper to remove the varnish. I chose not to completely sand her down (back to original wood), but rather use the deep burgundy as an undertone so she would have an aged look after completion. In other words, I was not planning a “pristine” white look.
This was the scary part. Putting on the first coat of white, and covering up her original burgundy. I used a water based paint (same as my previous project).
Here’s her first coat of white. The burgundy still shows through, but she’ll get a second coat.
Now that she’d had her second coat of white paint, I knew that I wanted contrast in all her gorgeous nooks and crannies. I opted for gray. I considered silver or blue, but I wanted Beauty to have an elegant, yet understated, look this time.
Beauty’s new look.
It really just took patience and tweeking to achieve the look I wanted with the right balance of rustic, but yet still keeping her elegant.
And here she is now in her corner spot. I put a little plant on top. She’s a candleholder, but that looks really pretty! We’ll see what I end up getting for her topper, but for now, I’m liking it!
These are the fun little projects that really make it feel like home here at Royalview. Our own personal touches, and items that we brought with us, that can still be incorporated into our new environment.
Till next time, stay safe, and follow your joy!
Johanna and Willie
acrossthelake.blog
DIY Home Decor Paint Project, Tall Wooden Candlestick Holder, Makeover, Before and After Transformation
Let’s get this dining room decorating party started!
This all began with bringing home items from Willie’s family’s woodturning shop. Sadly, everything is being shut down and closed, including his parents’ former residence and the family business.
But from this big life-changing event, we hope to keep and restore items and let them carry on memories with us and our branch of the family.
Willie recruited our Son, Brennen, and his Nephew, Roger to help bring home a couple of antique items that he had requested from the family estate. First is a wooden cabinet that his Dad made when he (his Dad) was in his twenties. Second, an antique RCA Victrola.
Roger (left), Brennen (right)
I really admire the craftmanship of this cabinet. Truly a one of a kind with hand turned wooden detailed accents. I love the fact that he (Willie’s Dad, Clyde) put red Christmas lights in the cabinet for illumination. This was probably made in the early 1960’s.
Then, this beautiful Victrola.
Isn’t that something?
It still has a record on the turn-table, and there are very old records in the cabinet below.
Very thankful to have these 2 family heirlooms here at Royalview.
Willie and I recently took a drive into Houston to visit the shop, as we’re attempting to get things cleared away, and I happened upon an old picture that was hanging in his Dad’s former office, and asked if I could bring it home. Willie said I could, and the thing that caught my eye about the picture, is the very ornate frame. I thought this would be a great salvage project, and a way to give this beautiful frame a new life in our home.
This frame is so beautifully detailed. You can see why it caught my eye.
I knew immediately upon seeing the frame, that I wanted to give it a white-wash paint effect.
Willie and I visited our local Ace Hardware and picked out a lovely shade of white and a few paint brushes for this project, as well as some other projects that I worked on at the same time. I’ll show you those as well in an upcoming post.
This process is really easy, and it doesn’t have to be perfect, by any means. I just had a lady ask me how I did this, or what type of mixture I used. I only use a water based paint. I keep my paintbrush pretty “dry” and do not load too much paint at one time. With this being a water based paint, it’s very easy to remove any excess with a damp paper towel or cloth. It’s just a matter of lightly adding almost a dry coat of paint, especially to the raised areas, which, on some of the higher point details, I did go heavier on the paint so they would really stand out.
I eye-balled it basically, and decided as I went along, how much I wanted the old paint to show through and how much white I wanted. At first, I thought I would do almost a full coverage of white, but since there is so much detail on this frame, I wanted some of the brown undertone to show through to really enhance the details. Plus, with there being white and brown tones in our dining room, this will be a great piece to bring it all together.
I did not put a top coat on, so that it would have a very old, rustic look.
And even though it has an old, rustic look, I believe it also has a very elegant look.
Once it was dry, I couldn’t wait to see how it looked hanging in our dining room, over the antique cabinet. We had to be very careful. This frame is very heavy.
Willie did a great job getting everything measured and put some heavy screws in the wall to hold it up safely.
The tall lamp you see in the above photo was designed by Willie’s Dad, and made by Willie. A lot of family history and craftmanship in this one room. Which, we also brought home a white lamp that looks just like this one, and put it in a corner in our bedroom. I just need to find a new lampshade.
I love the look of an empty frame on the wall, but for this, I wanted to add a little detail. While we were shopping at Hobby Lobby one day, I saw this wooden leaf cutout and knew it would be the perfect touch, since I also wanted to place a floral arrangement (that I had just put together) on top of the wooden cabinet, and since the arrangement is in a stemmed bowl, I knew the florals would look like they were in the frame.
So what are you thinking…? I’m loving it! But wait, there’s more… Stay with me…
And the full dining room wall view with our new arrivals:
It’s really beginning to look and feel cozy to me. I love how everything is coming together to feel more like home. I am such a nester by nature.
With the look of the antique cabinet, I wanted to bring in some playful elements to lighten the mood. One thing that came to mind was that I would love a white bicycle to put in the cabinet. When Willie and I were at Hobby Lobby, I went to the clearance section, and almost hidden from view, was that cute little bicycle clock you now see sitting on the cabinet. It was broken and the metal was black. We brought it home to fix it up. I was so tickled that I found a little bicycle. I’ll show you it’s story in an upcoming post with the other paint projects.
You just never know what you can find to elevate. I love finding items that I can salvage and bring back to life, that then bring fun new memories and loveliness to our home.
Till next time, I hope you always follow your joy. God is truly good!
Another fun crafting project at Royalview! I am certainly making up for lost time.
This project really takes me back… Not that I’ve ever made aroma beads, but I was an artistic candle maker and perfumer for nine years, so in the same wheelhouse for sure.
This all began as I’ve been looking for candles, and in particular, candle aromas for Royalview. We’ve tried several brands and scents since we’ve lived here, but nothing has quite fulfilled the aroma(s) that we’re craving. I have been on a specific hunt for Creme Brulee scent. Creme Brulee is our absolute favorite aroma. I worked with Creme Brulee a lot in the past and it is (in my humble opinion) the best smelling, best lasting, and for sure a favorite in terms of a wonderful and lasting scent throw. Our second favorite aroma is Cinnamon, and it has to be a true Cinnamon with a great scent throw as well.
So after searching and trying others’ candles, I decided I may just have to take a whack at it again to get the scents that we’re longing for. I turned to my trusty candle making supplier that I used for years, and hooray, they still carry my favorite Creme Brulee and Cinnamon aromas.
Thank you Lone Star Candle Supply.
The good news about ordering from Lone Star Candle Supply is that you do not have to be a business. I couldn’t remember if I would have to be in the candle making business to order or not, but nope, it is easy to order in a small quantity.
I ordered a small amount of the aroma beads (one pound), and a few one ounce bottles of scent to give this project a try.
Since I have not made aroma beads before, I was very happy that Lone Star Candle Supply has instructions on their site. The only other items that I had to order were a very specific type of plastic bottles, which I found on my favorite shopping site, Amazon. Here’s a link.
I got all my aroma bead making supplies together, and decided to mix these on my kitchen counter, but on an old thick towel, in case of spillage.
This is very simple to do, and without having to melt anything, bravo. I measured the amount of beads I wanted using a measuring cup. They (Lone Star) recommend weighing the beads, but I do not have a scale, so I did what I could with what I have on hand, just to give it a try. The instructions say that one pound of aroma beads can hold two ounces of scent. So, for my project, I went with 8 ounces of aroma beads to one ounce of scent. One ounce of scent in this regard is one, one ounce bottle, so again, very easy with no measuring of the liquid scent. Lone Star Candle Supply also indicates that these aroma beads can be dyed. I decided not to, since I know that both of these particular scents have a tint all their own. The Creme Brulee has a cream tint, and the Red Hot Cinnamon also has a cream tint leaning on the pinker side. I can definitely tell them apart based on their color, and of course their aroma.
I poured 8 ounces of beads into each plastic container, and then in one container I poured a (one ounce) bottle of Creme Brulee scent, and in the other, a (one ounce) bottle of Red Hot Cinnamon Scent. With the Red Hot Cinnamon scent, I know from experience to be very, very careful, and possibly wear gloves for this one. It can burn really bad. That’s why the scent is so good. It is very strong. So if you would ever want to give this a try for yourself, please use caution when pouring this scent, and wash your hands immediately. I would not recommend children handling this scent.
Once everything was in the bottles, I closed the lids tightly and shook each one very good, and for quite a little while. There was still scent puddling at the bottom, but Lone Star Candle Supply’s instructions said that the beads are very absorbent, so I knew it would probably just take a little time for them to absorb everything. I kept them on the towel, and all through the evening I would give them a little shake/toss to be sure all the beads had a chance to absorb the scent.
I did this for a couple of days, until all the scent had been absorbed, and they seemed dry.
When I knew for sure that I was going to try this project, I specifically looked for little decorative holders, so that I could put them out into my decor. I found some really cute and original items at New Waverly Antiques & Collectibles, as well as at Rosey Opals Collective Market.
I shopped around for decorative items that would hold the little aroma beads, and that would be pretty sitting out with our decor.
This trio of vintage style votive candle holders grabbed me immediately. What could be more perfect?
Creme Brulee Aroma Beads
These are from a booth at Rosey Opals Collective Market in New Waverly, TX (not sponsored, we just really love these shops we’re featuring and love supporting local businesses).
I’ve placed these on a shelf on our entertainment center.
And I forgot to mention, they smell AMAZING!! Willie came in while I was pouring the aroma beads into their holders, and said he could really smell them. My hope is that our home is continually filled with these delicious and welcoming scents, and we are greeted with these aromas upon entering our home.
For the three votive candlestick holders, I put Creme Brulee in all three, so that there would be a good amount of Creme Brulee in the living room area.
Here are the other three decorative holders filled with their aroma beads. You can see the color difference in the beads here. The back two are filled with Red Hot Cinnamon, and the little porcelain basket is filled with Creme Brulee.
I love the slight hint of color on the beads. It’s just enough, and has an elegant look.
Red Hot Cinnamon Scented Aroma Beads
And here’s the cute little porcelain cherub, on our entertainment center as well.
Such a fun and rewarding project. I’m really happy with the results. I’ll most likely get more supplies and keep an eye out for more small decorative bowls to place all around our home. Such a beautiful way to have our favorite scents always present, and I’m thinking in the long run, most probably more economical as well. I plan to keep these scents and the bottles on hand to recharge the beads when needed.
Win, win, win!
I hope this post brought a little DIY scent inspiration your way today.
Till next time, stay safe, and follow your joy! God is truly good!
Johanna and Willie
acrossthelake.blog
Making Aroma Beads at Home, Creme Brulee Scent, Red Hot Cinnamon Scent, Easy Scent DIY Project
It’s craft day at Royalview! I love it! I’ve not dabbled in any sort of craft in quite a while, so I am very happy to be at a point where I can play, and have fun decorating our new home.
As you may have seen from previous posts, Willie and I have been enjoying shopping at our local antique and home decor shops, and I’ve found some really cute items that I thought I could easily use as vases, as well as some actual vases.
The cute blue vase (with the wording Blooming Flowers, Sweet Home) pictured above is one that I found on Amazon a couple of months after we moved in. There was already a pretty blue floral arrangement included with the vase that we’ve enjoyed for a little while now, but with it being floral craft day, it’s getting in on the party too.
We found the stemmed white milk glass bowl at Sweet Magnolia Emporium’s booth at Yesterday’s Treasures in Willis, TX. This is one of my favorite spots to shop. Kelly has a very good eye for home decor items, and she is a joy to talk with. She has stayed in touch with me, and lets me know if she finds anything that will be perfect for Royalview. Check out the very tall, black plant stand above. That’s from her booth as well. I was so ecstatic to find that there.
Now, here’s what the blue vase’s arrangement looked like before (it was pretty as-is), as well as 2 white milk glass vases and 2 vases with yellow arrangements from Yesterday’s Treasures.
I of course knew that the yellow flowers would not be staying. When I shop, I always like to envision how I can work with an item that I like, that may not automatically fit in with Royalview’s aesthetics.
You may notice that the background in these pictures do not exactly match. There were actually (2) floral craft days and some additional decor added during the interim between, like the black plant stand. It’s all a continuous work in progress, that Willie and I are enjoying very much.
This is the first haul of faux florals that I picked up at Michaels in Conroe.
And, my second faux floral haul was from Hobby Lobby in Conroe.
Here’s a closeup of the stemmed white milk glass bowl that I got from Kelly (Sweet Magnolia Emporium), and the 2 super cute apothecary style glass jars that I got from Rosey Opals Collective Market in New Waverly, TX. Another new fave shopping spot! And, they have an ice cream parlor inside. I’ll have to do a post on all these super fun shops that we’ve been finding lately.
You can see that I love making a mess when I work.
It’s a happy mess. When you see this, you know I’m in my happy place.
It even extended out to the kitchen counter. Happy, happy arranging!
The color tones I am using here at Royalview lean heavily toward white, and denim hued blues, with a few added purples. I do have background/furniture combos in gray/white and brown/white, and some bits of black here and there. I carry these color tones throughout our home, and the whites, blues, and purples in our gardens as well. And green, I suppose, with all the greenery.
And here are some of the completed faux floral arrangements. You saw these two already, from the first pic. These are two of my favorites.
Do you remember the two yellow floral arrangements? Here they are now in blue. They are now residing on each side, atop our entertainment center.
And, the super gorgeous black plant stand from Kelly at Sweet Magnolia Emporium. You can also see one of the blue floral arrangements at the top of our entertainment center.
The blue vase arrangement now has a home on our dining room table.
Here’s a cute little purple arrangement that went in one of the smaller white milk glass vases.
This now resides on our coffee table.
I love how the purple helps break up all the blue and white, just a bit.
I’ll show you where the arrangement in the stemmed milk glass bowl, and the two clear glass apothecary glass jar arrangements now reside, in a future post. That’s a whole new story to share. We’ve had some beautiful new antique furniture additions in the dining room.
Do you enjoy making your own floral arrangements as well? What are your favorite color choices? Please feel free to leave a comment.
I hope my floral arrangement ideas inspire ideas for you, and what you may want to design for your home, from both vintage and new finds.
Till next time, stay safe and follow your joy! God is truly good!
Johanna and Willie
acrossthelake.blog
Faux Floral Arrangements, Blue Florals, White Florals, Purple Florals, Making Flower Arrangements at Home, Lifestyle Blog, Lake Life, Conroe, TX
Woo Hoo! We finally have outdoor seating at Royalview!
It’s been a few months in the waiting, but it is all coming together now.
Here’s our before photo. We’ve had a couple of plastic chairs to suffice during our wait. We had, I believe, 7 projects that needed to be completed before we could set out any nice furniture. Let’s see… first there was power washing of the entire house, gutters installed (full house), whole house generator installed, propane gas tank installed, whole yard major landscaping project, septic tank pumping (that was a curve-ball), and outdoor ceiling fan replacement. Yep – that’s 7!
But hey! We made it! Hooray!! Now we get to relax outdoors in comfort and joy.
Firstly, I knew I wanted an outdoor rug to go with our indoor theme, so I chose this pretty Nicole Miller New York Country Danica Indoor/Outdoor Area Rug in the color Blue/Gray.
The rug arrived very nicely rolled and wrapped in plastic.
Willie and I were able to easily unroll and place it where we wanted. It’s a nice heft, but not too heavy to move around.
The patio furniture set we chose is a 6 piece set from MIXPATIO. It’s from Amazon of course. I do like to state that Willie and I are now Amazon Associates. We love ordering from Amazon so much that we thought it would be nice to be able to share our favorites with you.
The outdoor furniture set we chose, and they do have options, includes a sofa, a marbled-look coffee table, 2 chairs, and 2 rocking chairs. We opted for white metal with beige cushions.
I think this set is so cute! I love how the arms curl around. Reminds me of a sleigh style. The backing is beautiful, so it looks very nice when looking out our backdoor window. They even have a lovely wicker edging/trim along the bottom sides. They are very well done, and very heavy, let me tell you. I somehow managed to help Willie tote the couch from our garage to the back porch. I did have to take frequent stops to set it down, but we made it . I love that this furniture is heavy. It’s a great quality and I will not be worried about it blowing away, I can assure you. This set is made with a steel frame.
The cushions are waterproof and very easy to maintain. We’ve not had these out very long, but I’ve already wiped off something that got on one of the cushions. From where, I do not know… but thankfully it came off easily, and we just had a very big thunderstorm last night (Easter night), and everything survived in good shape. The cushions are not wet today at all, so great news.
The tabletop on the outdoor coffee table has a lovely white/gray marble look. It actually matches our indoor countertops. Yay, bonus!
So, now as our little sign says, we can sit and relax.
But what about the 2 rocking chairs, right? Well, I chose this particular set with a plan already in mind. I wanted cute rockers for our front porch, so we can sit out there and enjoy our view of the lake from our hilltop.
Aren’t these just the cutest?
We’ve already received compliments from neighbors, including this very special neighbor, Carlton.
He came by to see what was going on over here, and hang out with us for a little while.
I will tell you, this outdoor furniture set does require full assembly. We ordered this in March, and Willie’s had time to tinker around with it, getting all the pieces put together and then the covers on the cushions. Everything was shipped separately and received on multiple days, but it all came in, and in a timely manner. We weren’t in a hurry since we had other projects in line before we could get this all set out.
We’re both very happy with how this set can be used on both our front and back patios. We’re really enjoying it and happy to have comfy seating.
Till next time, stay safe, and follow your joy! God is truly good!
MIXPATIO Outdoor Patio Furniture Set, Metal Frame Outdoor Furniture with Waterproof Cushions, Nicole Miller New York Country Danica Indoor/Outdoor Area Rug, Lake House Outdoor Decor, Conroe, Texas, Lakeview Home
Ohhhh…. I love outdoor lights at night…. How about you?
This is one project I couldn’t wait for. I’ve been praying for a beautiful garden all lit up at night for several years now, so I was very excited to shop for some gorgeous lighting for our new gardens.
I knew I wanted to shop my favorite go-to, Amazon, as they always have a very large selection of everything to choose from, and I love being able to shop from home sometimes, so yeah, they definitely had some exciting offerings to choose from.
We went with three different varieties of solar lights. Swaying Outdoor Lights (or Firefly Lights), Cracked Glass Ball/Globe Lights, and Pathway Lights (Lantern look).
Everything arrived very quickly and very nicely boxed.
Everything was pretty much assembled and ready to go. The only assembly was attaching the posts to the Pathway Lights, which Willie accomplished brillliantly.
We love that all the solar lights we purchased are automatic on/off. You just have to set them to “on”.
We acquired all the lights in March. It is now April and they have been coming on like clock-work every evening, and staying on all night long. I have risen very early before sunrise, and they’ve all still been on, and shining bright. They are all so beautiful, and have been very durable as well. The only evenings that they have not all stayed on overnight, has been due to rainy days. On sunny days, they are good to go, which makes perfect sense; they are powered by the sun.
They add so much enchantment, so effortlessly. Let’s take a look from our front door at dusk:
Royalview’s Front Door Lighted Path
We love this view so much, and now it’s been made extra special with the addition of the Solar Pathway Lights.
These lights are all just too much fun. As our gardens have grown, the lights still are holding their own, and shining tall and bright every night. We couldn’t be more pleased with every one of them.
Which is your favorite? Or, are you like me, and love them all? Feel free to leave a comment!
Till next time, stay safe, and follow your joy! God is good!
Johanna and Willie
acrossthelake.blog
(Willie and I are Amazon Associates. All links that you follow from our posts are directly connected to Amazon. Any purchases you make from our links will earn us a commission. Thank you!)
Solar Lights, Solar Pathway Lights, Solar Cracked Glass Ball Globe Lights, Solar Swaying Lightening Bug Lights, Amazon Finds, Amazon Associates, Garden Lights, Texas Gardens
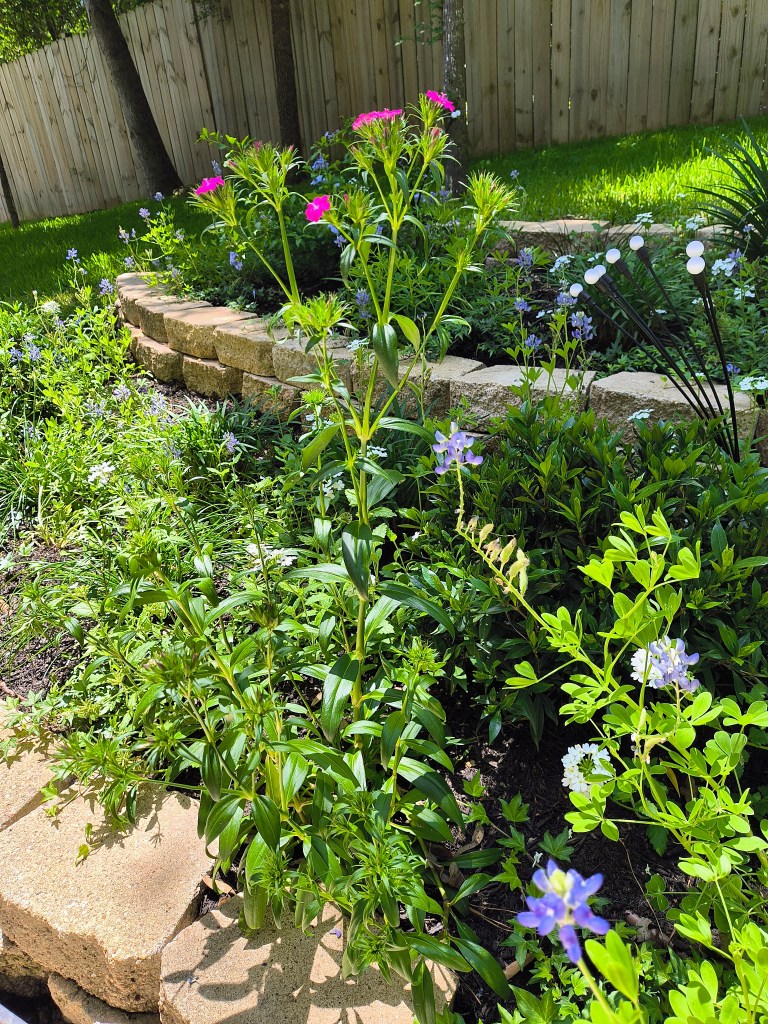
Wow, you guys, look how stunning the color is on our “mystery” Dianthus’ blooms! I’m still not sure of the species. I Google Lens’d my photos, and a lot of options came up: Dianthus Plumarius, Neon Purple, Fuchsia, Sweet William, Floral Lace Lilac, Jolt Purple, and more.
All I know for sure is, that they’re gorgeous, and I adore the color.
I’ve taken several photos over the past couple of days as they have been opening up. Here’s one from afar so you can see how tall this plant is, compared to the other plants in the garden. When this was planted up front, it was a lot smaller than the others.
Very Tall, Bright Pink Dianthus
You can see how many more buds are getting ready to open. This will be glorious in full bloom.
Bright Pink Dianthus
There was no filter used for this photography, and no edits. They are just this vibrant.
Beautiful Fuchsia Dianthus
Bright Fuchsia Dianthus
I hope you enjoyed the blooming of our Dianthus as much as we have.
Till next time, stay safe, and follow your joy! God is truly good!
Johanna and Willie
acrossthelake.blog
Bright Pink Dianthus, Flower Garden, Spring Flowers, Fuchsia, Hot Pink Flowers, Texas Flower Garden
Willie and I are very excited to be experiencing our very first Spring here at Royalview.
The trees and flowers are now in full bloom. We’re witnessing more and more water birds every day. It’s looking glorious here at home, and also across the lake.
View of the Lake Across the Street from Royalview
Our gardens and landscape are looking so pretty, especially after our first maintenance service call from our new landscaping company. Their team did a wonderful job getting us Spring ready, and Royalview’s gardens looking their best.
Royalview’s Front South Garden
Royalview’s Front South Garden
Royalview’s Front North Garden
Royalview’s Back Yard Garden
Royalview’s Back Yard Garden
Our Texas Garden in Full Bloom
We are both so thrilled that we’ve been blessed with our very own Texas Bluebonnets. These were a surprise from our landscape design team, Eagle Improvements.
Texas Bluebonnets at Royalview
We chose an array of blue, white, and purple flower varieties for our gardens, but there is one pop of pink in our back garden. This beautiful plant (Pink Dianthus) was a housewarming gift from our nieces Amy and Loralie.
Pink Dianthus at Royalview
Here are some beautiful closeup pictures of various flower varieties planted in our gardens.
Purple Salvia in our Front North and South Gardens
Purple Verbena
White Verbenas in all Gardens at Royalview
Plumbago in all Gardens at Royalview
Daisys in Front Gardens
Now, this next plant is a real mystery to me. When our landscape design company first came out, I spoke with Keren and requested another Pink Dianthus to go with the one that was gifted to us by our Nieces. Keren returned with this Dianthus. It was very small at the time it was planted, but it has sky-rocketed into a very tall and unusual looking plant.
“Mystery” Dianthus
It has a lot of little buds, so I cannot wait to see what it’s going to look like.
“Mystery” Dianthus Buds
It is a Dianthus. The tag read Dianthus when Keren brought it, and when our new landscape company’s owner (Boone, of Boone’s Landscaping) came by to look at our property, he saw it and called it some type of Dianthus. I cannot remember what he said it was, and when I Googled it, it just says Dianthus. So, it’s still a mystery to me as to the variety, and what color it is.
I’ll be sure to keep watch, and snap some photos when she blooms.
Till next time, Willie and I hope you’re enjoying your beautiful Spring blooms wherever you may be. Stay safe, and follow your joy. God is truly good!
Johanna and Willie
acrossthelake.blog
Texas garden, Spring Garden, Texas Bluebonnets, Lakehouse, Garden, Conroe, Texas, Spring Flowers
I cannot begin to tell you how thrilled I am that Willie and I are beginning to get our bedroom decorated. Certainly now feeling more like home here at Royalview.
We’ve been searching for a little while now for the bedding that we wanted to have here at Royalview. We love the look that we’ve achieved in our main living/dining room areas, and want to keep our theme going throughout our home, but without being too matchy. We came across this rustic quilt set while at the dentist’s office, actually , and thought this could be the one. This quilt/cover is lighter than a comforter, so it will be perfect for us now, going into the warmer months ahead.
It’s really quite lovely. It has the look/feel of a quilt, and I do love how the blue and white patterned pieces look very similar to the area rugs in our living and dining rooms. (See previous post re: Area Rugs)
I love that this quilt brings warmth to our bedroom, with it having not only the blue and white squares that go with our whole house theme, but also warming beige and browns. It enhances our bedroom furniture very well.
This gorgeous sheet set we chose from Feather & Stitch, really gives our bedding an overall wow-factor in pattern explosion.
This is really rolling out the country home theme here, but with elegance.
Here’s a peek at our dresser decor:
I told you we’ve been shopping! Various pieces shown here were shopped at Mimi’s on Main, Conroe, TX, and Hobby Lobby.
We still have a little ways to go, especially in our bathroom, but we’re getting there, and it does feel so much more homier now. Couldn’t be happier with how everything is coming together. It’s been so much fun shopping with Willie, and then yesterday, working together to get our room decorated. That’s what it’s all about. Building a happy home together with much love.
Till next time, stay safe, and follow your joy! God is truly good!
Johanna and Willie
acrossthelake.blog
Amazon Associates, Rustic Bedroom Decor, French County Home Decor, Lakehouse Decor, Rustic Quilt Set, Paisley Sheet and Pillowcase Set
The task of choosing the floor coverings for Royalview has not been taken lightly. We definitely wanted blue and white area rugs to go with our Lake House/French Country Home theme, as well as something that would be easy for us to install, and care for. We looked through a lot of designs and loved this Vintage Medallion Carpet that we found on Amazon. It is a washable, ultra thin, low pile area rug that really checked all the boxes for us.
It is so soft. It feels wonderful under bare feet. Now, this rug is thinner than any we’ve ever owned, and at first I wasn’t sure how we’d feel about it, but you know, it was easy for us to unpack and lay down ourselves, so that was an instant plus.
It lays very well. We’ve owned this now since February, so we’ve been living with it for a little while to see how it performs, and we’re still loving it a lot. We opted to not get padding, so it’s very close to the floor, but we’ve been fine with that. It seems to keep us from having any tripping issues as well, since it is thin to the floor. We have not had any slipping or movement issues either. Win, win, win, on this one.
We’re really enjoying the color and pattern of this beautiful area rug as well. The color tones are perfect for our furniture. This particular rug that we chose comes in different colors and patterns. This one is a Vintage Medallion Carpet in Blue-06, and we got to choose the size we wanted, which is 8×10.
We’ve enjoyed this rug so much, we decided to purchase another one for our dining room, this time in the size 6×9.
We think these rugs are really beautiful. They have a vintage, worn look, but still have vibrant color. Perfect for the look we’re trying to achieve in our home decor here at Royalview.
I wanted to also show you a closeup of our table decor. I purchased a vase with a faux floral arrangement from the brand Leftover on Amazon for our table, and we’re very happy with it.
I chose this arrangement for it’s vintage country style vase, and the wispy blue, purple, and white faux florals. It’s so pretty, and has some eucalyptus sprigs as well.
The big surprise in our dining room table decor is the large blue and white platter.
Would you believe I’ve had this and didn’t even know it? It’s the truth! I brought this along with us here to Royalview without even realizing it. I had some old platters that were apparently handed down to me? Given to me? by someone in my family. I was going through some of our boxes and found this with the other platters. I was so shocked. It is perfect for our home here.
I couldn’t have even imagined a more beautiful or fitting piece of decor for Royalview, and apparently I’ve had this for years without even realizing.
It’s like it’s meant to be here with me now at this time, and at this place.
But, back to our floor decor, here’s a picture of how the rugs look in both our dining and living room areas combined.
")